Is your projector’s once-vibrant display starting to look a little dull, hazy, or streaky? Before you blame the bulb or adjust your settings, take a closer look at the lens. Dust, smudges, and fingerprints are notorious culprits for degrading image quality, turning crisp visuals into a blurry mess. As a technician with over a decade of experience, I’ve seen countless projectors prematurely suffer simply due to improper lens care. Cleaning your projector lens correctly is not just about aesthetics; it’s crucial for maintaining optimal performance and extending the lifespan of your valuable equipment. But approach with caution – a delicate touch and the right tools are paramount to avoid irreversible damage.
Why a Spotless Projector Lens is Non-Negotiable
A projector lens is a precision optical instrument, far more sensitive than a typical pane of glass. Its intricate coatings are designed to optimize light transmission and minimize reflections, delivering the stunning images you expect. Even microscopic particles of dust or a faint fingerprint can scatter light, causing blurry spots, reduced contrast, and an overall faded picture. The impact of these imperfections is magnified exponentially when projected onto a large screen. What seems like a tiny blemish on the lens surface transforms into a glaring distraction, detracting from your presentations, movie nights, or gaming sessions. Furthermore, abrasive cleaning methods or harsh chemicals can permanently scratch the lens or strip away its anti-reflective coatings, leading to costly repairs or even the need for a full replacement. Proper, gentle cleaning is an investment in both your viewing experience and the longevity of your projector.
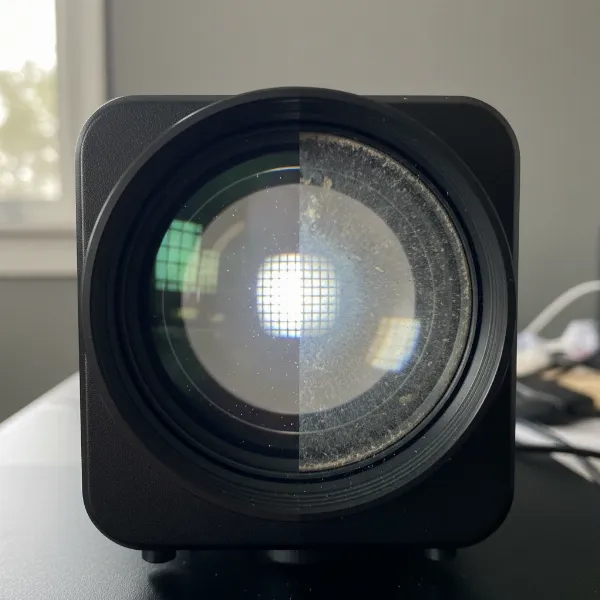 Close-up of a projector lens, half clean and half blurry with dust, illustrating the difference a clean lens makes
Assembling Your Arsenal: The Right Tools for a Gentle Clean
Before you even think about touching your projector lens, gather the correct, specialized cleaning tools. Using everyday household items can do more harm than good, introducing scratches or leaving behind residues. Here’s what you’ll need:
- Manual Lens Blower (Rocket Blower): This should always be your first tool. A manual blower uses a strong burst of air to dislodge loose dust and debris without making contact with the lens surface. It’s far safer than canned compressed air, which can sometimes spray propellants or moisture, leaving behind unwanted residue or forcing dust deeper into the projector.
- Soft Lens Brush: For any stubborn dry particles that the blower can’t remove, a soft, retractable lens brush designed specifically for optics is essential. These brushes have extremely fine, delicate bristles that won’t scratch the sensitive lens coating. Always keep the brush cap on when not in use to prevent it from collecting its own dust and oils.
- High-Quality Microfiber Cloth: Not all microfiber is created equal. You need a clean, lint-free microfiber cloth specifically manufactured for cleaning optical surfaces. These cloths are incredibly soft and designed to pick up oils and smudges without leaving streaks or scratches. Have a few on hand, ensuring they are always clean and stored in a dust-free environment.
- Specialized Lens Cleaning Solution: For smudges and fingerprints that dry dusting can’t conquer, a dedicated optical lens cleaning solution is necessary. These solutions are formulated to be safe for delicate coatings. Look for non-abrasive, ammonia-free, and alcohol-free (unless explicitly stated as safe by your projector’s manufacturer) options.
A Step-by-Step Guide to Flawless Lens Cleaning
With your tools ready, follow these precise steps to clean your projector lens safely and effectively:
Preparation is Key
Before any cleaning begins, safety and proper cooling are paramount.
- Power Down and Unplug: Turn off your projector completely and unplug it from the power source. This prevents accidental activation and electrical hazards.
- Cool Down Period: Projector lenses can get quite hot during operation. Allow your projector to cool down for at least 20 to 30 minutes. Cleaning a hot lens can cause cleaning solutions to evaporate too quickly, leaving streaks, or potentially damaging the lens itself due to temperature shock.
|
Our Picks for the Best projector in 2026
As an Amazon Associate I earn from qualifying purchases.
|
||
| Num | Product | Action |
|---|---|---|
| 1 | 【Officially-Licensed APP & Native 1080P】Thinnest 1.81\" Smart Mini Projector with WiFi and Bluetooth, Auto Focus & Keystone Portable Outdoor Projector, VOPLLS 4K Support Home Movie Projector |

|
| 2 | 【Official Licensed Google TV】4K Smart Projector with WiFi and Bluetooth, VOPLLS Outdoor Projectors with Dolby/Auto Focus, Portable Movie Phone Wireless Gaming Wifi Proyector for Bedroom/Home/Celling |
|
| 3 | Aurzen Roku TV Smart Projector with Wifi and Bluetooth, Roku Streaming Experience Built-in, 1080P FHD, DoIby Audio, Auto Focus & Keystone, Zoom, Movie Portable Outdoor Mini Projector, White |
|
| 4 | Epson Pro EX9270 Wireless 1080p 3LCD Projector 4,100 Lumens Color and White Brightness, Apple AirPlay, Miracast, Stream from Phone or Laptop, 2 HDMI Ports, 1.6x Optical Zoom, Built-In Speaker |
|
| 5 | HAPPRUN Native 1080P Bluetooth Mini Projector, Full HD Portable Outdoor Movie Projector with Built-in Speaker, Compatible with Smartphone, HDMI, USB, AV, Fire Stick, PS5 for Home, Bedroom, Outdoor Use |
|
| 6 | Epson Pro EX11000 3-Chip 3LCD Full HD 1080p Wireless Laser Projector, 4,600 Lumens Color/White Brightness, Miracast, 2 HDMI Ports, USB Power for Streaming, Built-in 16W Speaker |
|
| 7 | Projector-4K with WiFi and Bluetooth:[3500 ANSI/60W Dolby Audio/Official Licensed Apps], Outdoor-Projector with Smart OS 2.0 & AI Auto Focus,ONOAYO ONO5Pro 2.0 Smart Movie Projector for Indoor/Outdoor |
|
| 8 | 1500 ANSI Official Licensed Google TV Smart Projector, HAPPRUN 4K Full HD Home Theater with Auto Focus, Dolby Sound, Wi-Fi Bluetooth, Built-in Apps, Compatible with Phone & PC, Indoor & Outdoor Use |
|
| 9 | [3500 ANSI/ Official Apps/65W Audio] Outdoor 4K Projector with WiFi and Bluetooth, Auto Focus, Auto Keystone Smart Projector Support DoIby Audio, 2026 Upgrade GO2 Short Throw Projector with 360°Stand |
|
| 10 | [Built-in Official Apps/4K Support] Smart Outdoor Projector with WiFi and Bluetooth, 800ANSI Movie Projector, DoIby Audio with Dual Speaker, Auto Focus w/ YouTube&PrimeVideo Proyector, Upgrad P62 Pro |
|
Phase 1: Dust Dismissal
Your primary goal is to remove all loose particles without ever touching the lens.
- Initial Dusting with Blower: Hold your manual lens blower about 6-8 inches away from the lens. Use several short, firm bursts of air, working from the center of the lens outwards. This technique ensures that dust is pushed away from the optical path, not merely redistributed.
- Brush Away Residual Dust: If you still see fine dust particles after using the blower, gently extend your soft lens brush. With a very light touch, sweep the brush across the lens surface. You can use a gentle circular motion starting from the center and moving outwards, or sweep in one direction only. The key is gentle pressure to avoid grinding dust into the lens. Never touch the brush bristles with your fingers, as skin oils can transfer.
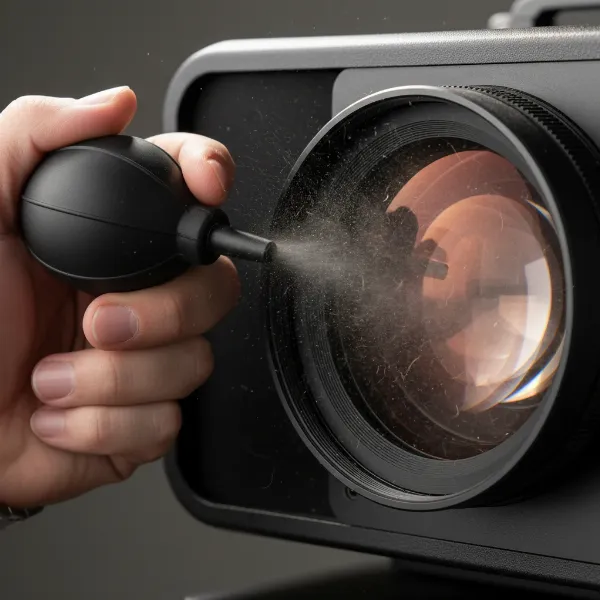 Person using a manual lens blower on a projector lens, removing dust carefully
Phase 2: Smudge Subtraction
For fingerprints and stubborn smudges, liquid cleaning is required, but with extreme care.
- Apply Solution to Cloth, Not Lens: Take your specialized lens cleaning solution and apply a small amount (one or two drops) directly onto a clean section of your microfiber cloth. The cloth should be damp, not soaked. Never spray the solution directly onto the projector lens, as it can seep into internal components and cause irreparable damage.
- Gentle Wiping Technique: With the dampened microfiber cloth, gently wipe the lens. You can use large, gentle sweeps in one direction or a light, circular motion starting from the center and working your way to the edges. Avoid wiping back and forth vigorously, as this can potentially grind any remaining micro-dust into the lens or create streaks. The goal is to lift the smudges, not rub them in. Use minimal pressure.
Phase 3: Final Polish and Inspection
The last steps ensure a truly clear lens.
- Remove Excess Moisture/Streaks: Using a fresh, dry part of your microfiber cloth (or a new, clean one), very gently buff the lens to remove any residual moisture or streaks. Again, use a light hand and consistent motion.
- Thorough Inspection: Once finished, hold the projector up to a light source (but do not turn it on) and inspect the lens from different angles. Look for any remaining dust, smudges, or streaks. If you find any, repeat Phase 1 and then Phase 2 with a very light touch.
Common Mistakes That Can Ruin Your Projector Lens
While the cleaning process might seem straightforward, many common errors can lead to irreversible damage. Awareness is your best defense against these pitfalls.
- The “Hot Lens” Hazard: Attempting to clean a lens immediately after use, when it’s still hot, is a major mistake. The heat can cause cleaning solutions to dry too quickly, leaving stubborn streaks or even damaging the lens’s protective coatings due to rapid temperature changes. Always allow ample time for your projector to cool down completely.
- Using Abrasive Household Items: This is perhaps the most frequent and damaging mistake. Materials like paper towels, facial tissues, old t-shirts, or rough cotton swabs may feel soft to the touch, but at a microscopic level, their fibers are abrasive. They can easily leave tiny scratches on your delicate lens surface, which will become highly visible when projected. Stick strictly to optical-grade microfiber cloths or lens cleaning paper.
- Spraying Directly: A Recipe for Disaster: Directly spraying any liquid onto the projector lens is a huge no-no. Liquid can seep into the projector’s internal components, leading to corrosion, short circuits, or damage to optical elements that are inaccessible for cleaning. Always apply cleaning solution to your cloth first.
- Excessive Pressure: The projector lens is sensitive. Applying too much pressure while wiping can not only scratch the surface but, in some cases, can even throw off the lens alignment, affecting focus and image uniformity. Always use a feather-light touch.
- Bare Hands and Fingerprints: The natural oils and acids on your fingertips can leave smudges that are notoriously difficult to remove from optical surfaces. These oils can also attract more dust. Avoid touching the lens with your bare hands at all costs.
- Misusing Compressed Air: While a manual lens blower is recommended, canned compressed air can be problematic. If held improperly (not upright) or too close, it can release propellants or moisture, leaving a residue on the lens. More importantly, it can force dust particles deeper inside the projector’s optical path, where they become trapped and much harder, if not impossible, to remove without professional disassembly.
- Over-Cleaning: It might sound counterintuitive, but cleaning your lens too frequently can increase the risk of accidental damage. Every time you touch the lens, there’s a slight chance of introducing micro-scratches. Only clean your projector lens when you notice a clear degradation in image quality due to visible dust or smudges. A tiny speck of dust that doesn’t impact the image isn’t worth the risk of cleaning.
> “The greatest enemy of a projector lens isn’t just dust, but the well-intentioned, yet misguided, attempts to clean it with the wrong tools and techniques.” – John Smith, Senior Optical Engineer
Beyond Cleaning: Proactive Care for Long-Lasting Clarity
Maintaining your projector’s lens goes beyond reactive cleaning; it involves proactive measures to keep it pristine longer.
- The Mighty Lens Cap: This simple accessory is your first line of defense against dust and accidental damage. Always keep the lens cap on when the projector is not in use or during storage. It’s a small habit that makes a huge difference.
- Environmental Control: Where you place your projector matters. Try to locate it in a relatively dust-free environment, away from open windows, high-traffic areas, or sources of smoke. While not always possible, minimizing airborne particles will reduce the frequency of lens cleaning needed.
- Regular Filter Maintenance: Many projectors have air filters that prevent dust from entering the internal components. Regularly cleaning or replacing these filters (as per your projector’s manual) can significantly reduce the amount of dust that eventually settles on the lens and other internal optics. Remember to clean filters with a soft brush or vacuum, not compressed air that could blow dust inside.
- When to Call a Professional: If you notice internal dust on your lens, persistent haziness that doesn’t respond to external cleaning, or a problem you’re unsure how to handle, resist the urge to open the projector yourself. Projectors are complex devices, and internal cleaning or repairs should be left to certified professionals. Attempting to do it yourself can void warranties and cause more damage.
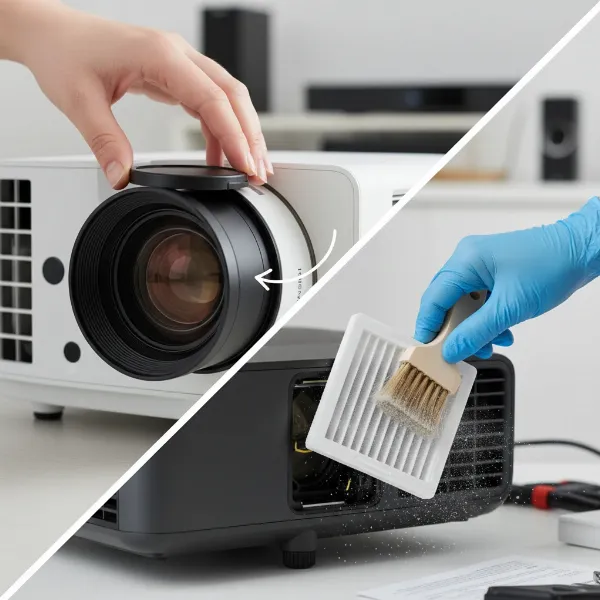 A person placing a lens cap on a projector and wiping a filter, illustrating proactive maintenance
Conclusion
A clear projector lens is fundamental to delivering the sharp, vibrant images you expect from your device. By understanding the delicacy of optical surfaces and adhering to a strict regimen of gentle, informed cleaning, you can protect your investment and ensure years of optimal performance. Remember to prioritize preparation, use only specialized tools, and meticulously follow a step-by-step process for dust and smudge removal. Most importantly, be vigilant in avoiding common cleaning mistakes that can cause irreversible damage. Embrace proactive habits like using a lens cap and maintaining a clean environment, and your projector will reward you with unparalleled visual clarity. How often do you inspect your projector lens for signs of wear and tear, and what are your biggest challenges in keeping it spotless?
Frequently Asked Questions
Can I use alcohol wipes on my projector lens?
Generally, no. While some specific optical cleaning solutions may contain alcohol, generic alcohol wipes (like those used for sanitizing) are typically too harsh for delicate projector lens coatings. They can strip anti-reflective layers or leave streaks, causing permanent damage. Always opt for a specialized, approved lens cleaning solution.
How often should I clean my projector lens?
You should clean your projector lens only when you notice a visible reduction in image quality due due to dust, smudges, or fingerprints. Over-cleaning increases the risk of accidental scratches. For general maintenance, a visual inspection every few months is usually sufficient, combined with proactive measures like using a lens cap.
Can I use Windex or glass cleaner on my projector lens?
Absolutely not. Household glass cleaners like Windex contain ammonia and other harsh chemicals that are highly corrosive to the specialized coatings on projector lenses. Using them will almost certainly damage the lens, leading to irreparable haziness or stripped coatings. Always use lens-specific cleaning solutions.
What should I do if my projector lens is already scratched?
Unfortunately, once a projector lens is scratched, there is no safe DIY method to repair it. Scratches are physical damage to the glass or its coating. Depending on the severity and location of the scratch, it might be visible in the projected image. Your best course of action is to contact the projector manufacturer or a professional repair service for potential lens replacement.
Can I clean the inside of my projector lens myself?
It is strongly advised against attempting to clean the inside of your projector lens yourself. Opening a projector requires specialized tools and knowledge, and you risk damaging delicate internal components, voiding your warranty, or introducing more dust. If you suspect internal dust, consult a professional technician.