Few things are more frustrating than settling in to enjoy a movie or prepare for an important presentation, only to be greeted by a skewed or trapezoidal image from your projector. Instead of a crisp, rectangular display, you see a picture that’s wider at the top, narrower at the bottom, or even tilted. This common issue, known as image distortion, can ruin the viewing experience and undermine your professional efforts. Fortunately, most distorted projector images can be resolved with a few straightforward adjustments. This comprehensive guide will walk you through understanding the causes of these distortions and provide a step-by-step approach to bring your projector’s image back into perfect alignment.
Understanding Projector Image Distortion
At its core, projector image distortion refers to any deviation from a perfectly rectangular and evenly proportioned image. The most common form is a “trapezoid” effect, where the top or bottom of the image is noticeably wider or narrower than the opposite side. This happens because the light from the projector lens hits the screen at an angle, causing the image to stretch or compress unevenly. Other distortions can include bowing, pincushion effects, or a general tilting of the entire image. Recognizing these visual cues is the first step toward diagnosing and ultimately fixing the problem.
Common Causes of Projector Image Distortion
Before diving into solutions, it’s crucial to understand the underlying reasons why your projector might be displaying a distorted image. Often, the issue stems from a combination of physical setup and digital settings.
- Incorrect Projector Placement: This is perhaps the most frequent culprit. If the projector is not perfectly centered with the screen, or if it’s positioned too high, too low, or off to one side, the light path to the screen becomes uneven, leading to distortion.
- Tilted Projection Surface (Screen): While we often focus on the projector, the screen itself plays a vital role. If your projection screen isn’t perfectly flat, or if it’s tilted forwards or backwards, it can introduce distortions to the image regardless of how well the projector is positioned.
- Keystone Effect: This is a natural optical phenomenon. When a projector isn’t perpendicular to the screen (i.e., it’s tilted up or down, or to the side), the projected image will naturally appear trapezoidal. Vertical keystone occurs when the projector is aimed up or down, while horizontal keystone happens when it’s off-center left or right.
- Improper Keystone Correction Settings: Most modern projectors offer “keystone correction” features to digitally compensate for the trapezoid effect. However, if these settings are adjusted incorrectly, or pushed to their extremes, they can introduce new distortions or degrade image quality.
- Lens Issues: A dirty, smudged, or physically damaged projector lens can cause parts of the image to appear blurry, stretched, or uneven. Even minor smudges can refract light in unexpected ways, leading to subtle distortions.
- Internal Calibration Problems: Less common, but possible, are internal software or hardware malfunctions that affect the projector’s internal image processing. These might manifest as persistent distortions that cannot be fixed by external adjustments.
Step-by-Step Solutions to Fix a Distorted Projector Image
Addressing image distortion usually involves a methodical approach, starting with physical adjustments and moving to digital corrections.
Optimizing Projector Placement and Alignment
The most fundamental step to a perfectly rectangular image is ensuring your projector is positioned correctly relative to your screen.
- Center the Projector: Ideally, your projector should be placed directly in line with the horizontal center of your projection screen. If it’s off to the left or right, you’ll encounter horizontal distortion.
- Adjust Height and Angle: The projector should be at a height where the center of its lens is aligned with the center of your screen. If this isn’t possible, aim to have the projector as perpendicular to the screen as possible, minimizing any upward or downward tilt. Many projectors have adjustable feet or mounts that allow for fine-tuning.
- Ensure Perpendicularity: Strive to have the projector’s lens axis pointed directly at the screen’s center, forming a 90-degree angle. This is the optimal setup to avoid any natural keystone effect.
|
Our Picks for the Best projector in 2026
As an Amazon Associate I earn from qualifying purchases.
|
||
| Num | Product | Action |
|---|---|---|
| 1 | 【Officially-Licensed APP & Native 1080P】Thinnest 1.81\" Smart Mini Projector with WiFi and Bluetooth, Auto Focus & Keystone Portable Outdoor Projector, VOPLLS 4K Support Home Movie Projector |

|
| 2 | HAPPRUN Native 1080P Bluetooth Mini Projector, Full HD Portable Outdoor Movie Projector with Built-in Speaker, Compatible with Smartphone, HDMI, USB, AV, Fire Stick, PS5 for Home, Bedroom, Outdoor Use |
|
| 3 | [Built-in Official Apps/4K Support] Smart Outdoor Projector with WiFi and Bluetooth, 800ANSI Movie Projector, DoIby Audio with Dual Speaker, Auto Focus w/ YouTube&PrimeVideo Proyector, Upgrad P62 Pro |
|
| 4 | 【Official Licensed Google TV】4K Smart Projector with WiFi and Bluetooth, VOPLLS Outdoor Projectors with Dolby/Auto Focus, Portable Movie Phone Wireless Gaming Wifi Proyector for Bedroom/Home/Celling |
|
| 5 | Projector-4K with WiFi and Bluetooth:[3500 ANSI/60W Dolby Audio/Official Licensed Apps], Outdoor-Projector with Smart OS 2.0 & AI Auto Focus,ONOAYO ONO5Pro 2.0 Smart Movie Projector for Indoor/Outdoor |
|
| 6 | 1500 ANSI Official Licensed Google TV Smart Projector, HAPPRUN 4K Full HD Home Theater with Auto Focus, Dolby Sound, Wi-Fi Bluetooth, Built-in Apps, Compatible with Phone & PC, Indoor & Outdoor Use |
|
| 7 | Aurzen Roku TV Smart Projector with Wifi and Bluetooth, Roku Streaming Experience Built-in, 1080P FHD, DoIby Audio, Auto Focus & Keystone, Zoom, Movie Portable Outdoor Mini Projector, White |
|
| 8 | [3500 ANSI/ Official Apps/65W Audio] Outdoor 4K Projector with WiFi and Bluetooth, Auto Focus, Auto Keystone Smart Projector Support DoIby Audio, 2026 Upgrade GO2 Short Throw Projector with 360°Stand |
|
| 9 | Epson Pro EX11000 3-Chip 3LCD Full HD 1080p Wireless Laser Projector, 4,600 Lumens Color/White Brightness, Miracast, 2 HDMI Ports, USB Power for Streaming, Built-in 16W Speaker |
|
| 10 | Epson Pro EX9270 Wireless 1080p 3LCD Projector 4,100 Lumens Color and White Brightness, Apple AirPlay, Miracast, Stream from Phone or Laptop, 2 HDMI Ports, 1.6x Optical Zoom, Built-In Speaker |
|
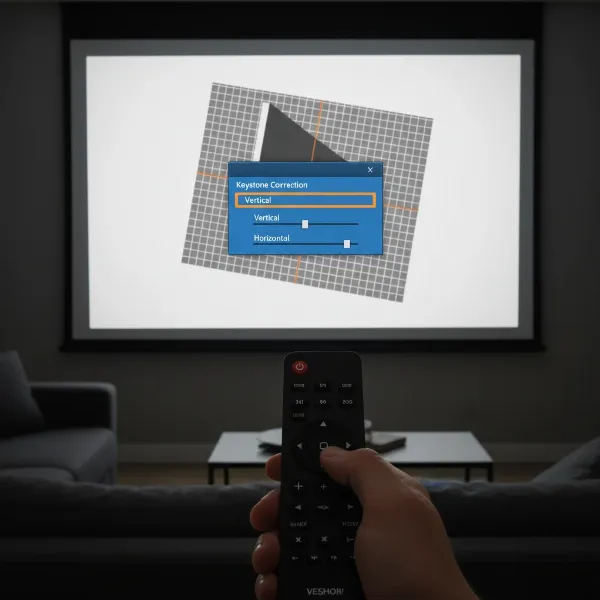
Mastering Keystone Correction
Keystone correction is a digital tool designed to fix trapezoidal images when perfect physical alignment isn’t feasible. While useful, it should be used judiciously, as it can subtly reduce image quality by stretching or compressing pixels.
- Vertical Keystone Correction: This is used when the top or bottom of your image is wider than the other. If your projector is angled upwards, the top of the image will be wider. If it’s angled downwards, the bottom will be wider. Access this setting in your projector’s menu and adjust it until the vertical sides of your image are parallel.
- Horizontal Keystone Correction: If your projector is placed off-center to the left or right, one side of the image will appear wider. Horizontal keystone correction allows you to square up the image by making the parallel sides vertical.
- Manual vs. Automatic Keystone Correction: Many projectors offer automatic keystone correction. While convenient, automatic correction isn’t always perfect. If your image is still distorted, disable the automatic feature and use manual adjustments for more precise control.
- When to Avoid It: If you can achieve a perfect physical setup, it’s often best to leave keystone correction at zero. Overusing this feature, especially pushing it to its limits, can introduce pixelation or a slight blurring effect, as the projector is digitally manipulating the image to fit a shape it wasn’t originally designed for.
Adjusting Your Projection Screen
Sometimes, the issue isn’t with the projector at all, but with the surface it’s projecting onto.
- Ensuring a Flat and Smooth Surface: A wrinkled or uneven screen can introduce subtle distortions. Make sure your screen is taut and free from creases.
- Mounting the Screen Correctly: If using a fixed screen, ensure it’s mounted perfectly level and flat against the wall. For pull-down screens, make sure they are fully extended and properly weighted to prevent curling at the edges.
- Importance of Screen Perpendicularity: Just as the projector needs to be perpendicular to the screen, the screen itself should be perpendicular to the floor and walls. A tilted screen, even if the projector is perfectly aligned, will result in a distorted image.
Checking and Cleaning the Projector Lens
A seemingly small detail like a dirty lens can have a significant impact on image quality and perceived distortion.
- Inspect for Smudges or Dust: Power off and unplug your projector. Carefully inspect the lens surface for any fingerprints, dust, or smudges.
- Proper Cleaning Techniques: Use a microfiber cloth specifically designed for optics, or a lens cleaning pen. Breathe gently on the lens to create some condensation, then wipe carefully from the center outwards in a circular motion. Avoid abrasive materials or harsh chemical cleaners.
- Identifying Physical Damage: While cleaning, check for any scratches, cracks, or internal fogging that might indicate a damaged lens. Physical damage usually requires professional repair or replacement.
Resetting Projector Settings
If you’ve tried all the physical adjustments and keystone corrections, and the distortion persists, it might be an issue with a previously saved or corrupted setting.
- How to Perform a Factory Reset: Most projectors have an option in their on-screen menu to restore factory default settings. This will revert all picture, audio, and network settings to their original state.
- Restoring Default Image Settings: Before a full factory reset, you can try just resetting the image or display settings. This will clear any unusual brightness, contrast, color, or keystone settings that might be causing the problem.
 A person making adjustments to a projector's keystone correction settings on an on-screen menu to fix a trapezoid image. This image should show a hand interacting with a remote control pointing at a projection screen with a distorted image, and the projector menu visible.
Advanced Troubleshooting and When to Seek Professional Help
While most image distortions can be resolved with the steps above, some issues may require more advanced intervention.
- Firmware Updates: Projector manufacturers occasionally release firmware updates to fix bugs, improve performance, or add new features. Check your projector’s model number and the manufacturer’s website to see if an update is available. A corrupted or outdated firmware could, in rare cases, lead to display issues.
- Hardware Malfunction: If you’ve exhausted all troubleshooting steps and the distortion persists, it could indicate a more serious internal hardware problem. Signs of this might include flickering, persistent lines, or uncorrectable geometric distortions even with perfect setup. This could involve issues with the projector’s internal optics, display chips (DLP chip, LCD panels), or control board.
- Contacting Manufacturer Support: When you suspect a hardware malfunction or if you’re uncomfortable performing advanced checks, it’s best to contact the projector manufacturer’s support or a certified repair technician. Provide them with a detailed description of the problem and the troubleshooting steps you’ve already taken.
“Many users overlook the simple act of checking the projector’s physical alignment before diving into complex menu settings. Often, a slight tilt or off-center placement is the root cause of an annoying trapezoid image, easily fixed without touching a single digital correction.” – Alex Chen, Lead Projector Technician
Preventing Future Projector Image Distortion
Once you’ve achieved a perfectly aligned image, adopting best practices can help prevent future distortions and ensure optimal performance.
- Best Practices for Projector Setup:
- Whenever possible, aim to place your projector at the same height and horizontally centered with your screen.
- Use a sturdy projector mount (ceiling or wall) if you plan for a permanent setup, as this helps maintain consistent alignment.
- Always ensure the projector is level. Use a small spirit level if needed.
- Regular Maintenance:
- Keep the projector lens clean with appropriate cleaning tools.
- Dust the projector regularly to prevent accumulation, especially around air vents, which can impact internal temperatures and component longevity.
- Understanding Your Projector’s Features:
- Take the time to read your projector’s user manual. It contains specific information about its keystone correction capabilities, optimal throw distances, and unique features that can help you achieve the best image quality.
Fixing a distorted projector image, whether it’s a simple trapezoid or a more complex skew, often comes down to careful observation and methodical adjustments. By understanding the causes, starting with physical alignment, and then moving to digital corrections, you can restore your projector’s image to its intended clarity and shape. A perfectly rectangular projection not only enhances your viewing experience but also ensures that your content is presented exactly as it should be.
What was the most challenging distortion you’ve ever had to fix on a projector, and how did you resolve it?
Frequently Asked Questions
What exactly is the “keystone effect” in projectors?
The keystone effect is an optical phenomenon that causes the image projected by a projector to appear trapezoidal instead of rectangular. It occurs when the projector’s lens is not perfectly perpendicular to the projection surface, resulting in one side of the image being wider or narrower than the other. Projectors include “keystone correction” features to digitally compensate for this.
Can using keystone correction degrade my image quality?
Yes, excessive use of keystone correction can subtly degrade image quality. Since keystone correction digitally stretches or compresses pixels to reshape the image, it can lead to a slight loss of sharpness, pixelation, or a less vibrant picture. For the best image quality, it’s always recommended to achieve physical alignment as much as possible and use keystone correction minimally.
Why is my projector image only half-distorted or unevenly focused?
If only part of your image is distorted or out of focus, it could point to several issues. It might be due to a dirty or damaged lens, where only a section is affected. Alternatively, it could indicate an internal hardware problem, such as an issue with one of the projector’s internal display panels (for LCD projectors) or a malfunction within the optics. Check the lens first, then consider a factory reset.
My projector has auto keystone, but the image is still distorted. What should I do?
Automatic keystone correction doesn’t always achieve perfect results, especially in complex setups. If auto keystone isn’t working, try disabling it and manually adjusting the vertical and horizontal keystone settings through your projector’s on-screen menu. Also, double-check your physical projector placement and screen alignment, as perfect physical setup reduces the burden on auto-correction.
How can I make sure my projection screen is perfectly flat?
For pull-down screens, ensure the screen is fully extended and the bottom bar is weighted evenly to keep it taut. For fixed screens, make sure the mounting surface is flat and the screen frame is assembled without any twists or bows. Regularly cleaning the screen can also help maintain its flatness over time by preventing material buildup.