Imagine transforming your living room into a cinematic wonderland without breaking the bank, right from the comfort of your own home. Creating a painted projector screen on your wall offers an incredibly cost-effective and highly customizable alternative to traditional screens, allowing you to tailor your viewing experience precisely to your space and preferences. This comprehensive DIY guide will walk you through every step of the process, from meticulous wall preparation and selecting the perfect paint to precise application techniques and essential finishing touches, ensuring you achieve an optimal, professional-grade image quality.
Why Choose a Painted Projector Screen?
|
Our Picks for the Best projector in 2026
As an Amazon Associate I earn from qualifying purchases.
|
||
| Num | Product | Action |
|---|---|---|
| 1 | Astronaut Galaxy Projector with Bluetooth Speaker & White Noise, App & Remote Control Star Projector, Galaxy Projector for Bedroom Adults Kids, Spaceman Night Light for Gaming Room, Home Theater |

|
| 2 | Mini Projector with Built-in Rechargeable Battery for Outdoor, Portable Projector with WiFi and Bluetooth, 4K Projector for Bedroom, Smart Projector |
|
| 3 | Magcubic Mini Projector with WiFi 6 and Bluetooth 5.4, Portable Projector 4K Support, 5W Soundbase Speaker, Auto Vertical Keystone 180°Rotatable Smart Proyector for Movie Home Outdoor |
|
| 4 | Projector-4K with WiFi and Bluetooth:[3000 ANSI/40W Dolby Audio/Official Licensed Apps], Outdoor-Projector with Smart OS 2.0 & AI Auto Focus,ONOAYO ONO5Pro 2.0 Smart Movie Projector for Indoor/Outdoor |
|
| 5 | 【Officially-Licensed APP & Native 1080P】Thinnest 1.81\" Smart Mini Projector with WiFi and Bluetooth, Auto Focus & Keystone Portable Outdoor Projector, VOPLLS 4K Support Home Movie Projector |
|
| 6 | [Officially-Licensed App & Auto Focus]Smart Mini Projector with WiFi and Bluetooth, XuanPad 4K Support Movie Projector, Portable Native 1080P Outdoor Projector with 360° Stand |
|
| 7 | HAPPRUN Native 1080P Bluetooth Mini Projector, Full HD Portable Outdoor Movie Projector with Built-in Speaker, Compatible with Smartphone, HDMI, USB, AV, Fire Stick, PS5 for Home, Bedroom, Outdoor Use |
|
| 8 | Aurzen Roku TV Smart Projector with Wifi and Bluetooth, Roku Streaming Experience Built-in, 1080P FHD, Dolby Audio, Auto Focus & Keystone, Zoom, Movie Portable Outdoor Mini Projector, White |
|
| 9 | [Built-in Official Apps/4K Support] Smart Outdoor Projector with WiFi and Bluetooth, 800ANSI Movie Projector, DoIby Audio with Dual Speaker, Auto Focus w/ YouTube&PrimeVideo Proyector, Upgrad P62 Pro |
|
| 10 | Mini Smart Projector, 1500 ANSI Portable Projector with WiFi and Bluetooth, HAPPRUN 4K Full HD Home Theater with 270° Stand, Dolby Sound, Built-in Apps,Compatible with Phone & PC, Indoor & Outdoor Use |
|
Opting for a painted projector screen brings a host of benefits that make it an attractive choice for many home theater enthusiasts. Firstly, it’s significantly more cost-effective than purchasing a large, high-quality physical screen, allowing you to allocate more of your budget to the projector itself or other home theater components. Secondly, painting your screen directly onto the wall offers unparalleled customization; you can perfectly match the size and aspect ratio to your room’s dimensions and your projector’s capabilities.
Beyond budget and flexibility, a painted screen seamlessly integrates into your existing decor. When the projector is off, it simply looks like a well-painted wall, avoiding the visual clutter of a mounted or retractable screen. This space-saving advantage is particularly beneficial in smaller living areas where a permanent screen might be impractical. Ultimately, a DIY painted screen empowers you to create an immersive cinematic experience that is both personal and visually harmonious with your home.
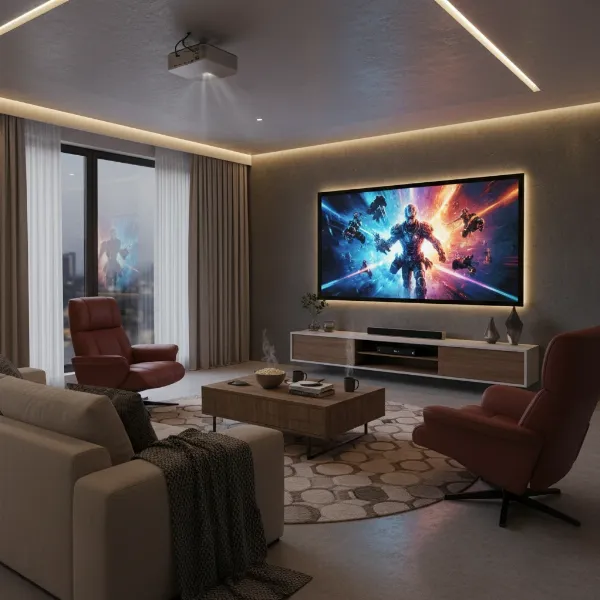 A modern living room with a large, perfectly painted projector screen on the wall, showcasing a vibrant movie scene.
Essential Materials You’ll Need
Embarking on this DIY project requires a careful selection of tools and materials to ensure a smooth process and a spectacular final result. Gathering everything beforehand will streamline your efforts and help you achieve a professional finish.
For Wall Preparation:
- Cleaning Supplies: A degreasing cleaner and several clean cloths are crucial for removing dirt, grease, and any existing wall imperfections.
- Sanding Paper: You’ll need both 120-grit and finer 220-grit sandpaper to achieve a perfectly smooth surface, essential for optimal image clarity.
- Drywall Compound/Spackle & Putty Knife: For filling any holes, cracks, or minor dents in the wall.
- Painter’s Tape: High-quality tape is non-negotiable for creating crisp, straight lines and protecting surrounding areas.
- Drop Cloths/Plastic Sheeting: To shield your floors and furniture from paint drips and dust.
For Painting:
- High-Quality Primer: A white, water-based primer provides the ideal consistent base for your screen paint.
- Projector Screen Paint: While specialized options exist, a high-quality, flat or matte latex paint can also work wonders.
- Paint Roller & Tray: A smooth foam roller is highly recommended for an even, streak-free application.
- Paint Brushes: Useful for cutting in edges and detailed work around the masked area.
For Measuring & Marking:
- Measuring Tape: For precise measurements of your screen dimensions.
- Pencil: For initial, light markings on the wall.
- Your Projector: Essential for projecting the image onto the wall to accurately determine your screen size and aspect ratio before taping.
Preparing Your Wall for the Perfect Canvas
The foundation of an outstanding projected image lies in the quality of your wall preparation. A perfectly smooth, clean, and primed surface is paramount for reflecting light evenly and ensuring vibrant, undistorted visuals. Do not rush this critical phase.
Begin by thoroughly cleaning and repairing your wall. Use a degreasing cleaner to remove any dirt, dust, or oily residue, paying close attention to areas around light switches and baseboards. Once dry, meticulously inspect the surface for imperfections such as nail holes, cracks, or bumps. Fill any holes and cracks with drywall compound or spackle, ensuring they are flush with the wall surface.
Next, sand for smoothness. Lightly sand the entire area, starting with 120-grit sandpaper to smooth out any repairs or rough patches. Follow this with a finer 220-grit sandpaper to achieve an ultra-smooth finish. This step eliminates any texture that could distort the projected image. After sanding, vacuum all dust and wipe the wall clean with a dry cloth.
Now, prime the surface. Apply two thin, even coats of high-quality white primer. Primer improves paint adhesion and creates a uniform white base, which is crucial for accurate color reproduction and brightness from your projector. Allow sufficient drying time between coats (typically 4-6 hours) and at least 24 hours before applying your projector screen paint.
Finally, mark your screen area. This is where your projector comes in handy. Set up your projector and project the desired image onto the wall. Adjust the size and position until you achieve your preferred screen dimensions. Using a pencil, lightly mark the four corners of your projected image. Then, carefully apply high-quality painter’s tape along these marks, ensuring all edges are perfectly straight and pressed firmly to prevent paint bleed. Consider leaving an extra few inches outside your main screen area if you plan to add a black border later. Cover any surrounding areas, floors, and furniture with drop cloths or plastic sheeting.
Choosing the Right Paint for Your Projector Screen
The type and color of paint you select will significantly impact the quality of your projected image. Understanding the options will help you make an informed decision based on your room’s ambient light, projector’s brightness, and your budget.
Dedicated projector screen paints are specifically formulated to optimize gain, contrast, and color accuracy. Brands like Paint On Screen offer specialized products designed for superior performance, often providing better light reflection and ambient light rejection. While these options tend to be more expensive, they can deliver exceptional results, particularly for discerning viewers.
If you’re on a tighter budget or prefer a more readily available solution, DIY paint mixes using high-quality latex paint can also work effectively. The most crucial factor here is the sheen: you must choose an absolutely flat or matte finish. Glossy or semi-gloss paints will cause distracting hotspots and glare, severely degrading your viewing experience.
When it comes to color considerations, the optimal choice depends on your viewing environment:
- White paint offers maximum brightness and is generally best suited for very dark rooms with minimal ambient light. It works well with projectors that have lower light output (lumens).
- Light grey paint is an excellent choice for rooms with moderate ambient light. It helps enhance contrast and deepen black levels, making the image appear richer without sacrificing too much brightness. Many experts recommend light grey for projectors producing over 3,500 lumens. Neutral grey tints, such as “Silver Screen” or “Gray Screen,” are often cited as good options.
- Silver paint strikes a balance between white and grey, offering good brightness while still boosting contrast.
Understanding gain is also important. Gain refers to how much light a surface reflects. A gain of 1.0 reflects all light equally in all directions. Some specialized projector paints have a higher gain, concentrating light back towards the viewer, which can make the image appear brighter but potentially narrow the optimal viewing angle.
“The difference a truly matte finish makes for a painted projector screen cannot be overstated. Any sheen will create distracting glare and hot spots, ruining the immersion.” – John Smith, Home Theater Specialist
Step-by-Step Paint Application
With your wall perfectly prepped and your paint selected, it’s time for the exciting part: applying the screen paint. Patience and careful technique are key to achieving a smooth, uniform surface that will bring your projected images to life.
-
Mix the Paint: Before you begin, thoroughly stir your chosen projector screen paint. This ensures that all components, especially any specialized reflective particles, are evenly distributed throughout the mixture, leading to consistent color and performance across your screen.
-
Apply First Coat: Dip your smooth foam roller into the paint tray, ensuring it’s evenly loaded but not dripping. Begin applying the paint from one corner of your masked screen area, working your way across in smooth, overlapping strokes. Aim for thin, even coats to prevent drips and roller marks. For the edges where the wall meets the painter’s tape, use a smaller brush to carefully “cut in” for crisp lines.
-
Allow Drying Time: Once the first coat is complete, resist the urge to immediately apply another. Allow the paint to dry completely according to the manufacturer’s instructions. This typically takes 4 to 6 hours. Applying subsequent coats too soon can lead to uneven drying, streaks, and peeling.
-
Apply Subsequent Coats: After the first coat is fully dry, apply 2 to 3 more thin, even coats. The goal is to achieve a perfectly uniform surface with no visible roller marks or inconsistencies. Maintain consistent pressure and overlap your strokes slightly to ensure comprehensive coverage. The number of coats required can vary based on the paint type and the underlying wall color, but more thin coats are always preferable to fewer thick ones.
-
Remove Masking Tape: This step is crucial for achieving clean, sharp edges. While the final coat of paint is still slightly tacky—typically within 30 to 60 minutes of application—carefully and slowly peel off the painter’s tape. Pulling the tape at an angle, away from the freshly painted surface, helps to prevent the paint from tearing or lifting, revealing your professional-looking screen outline.
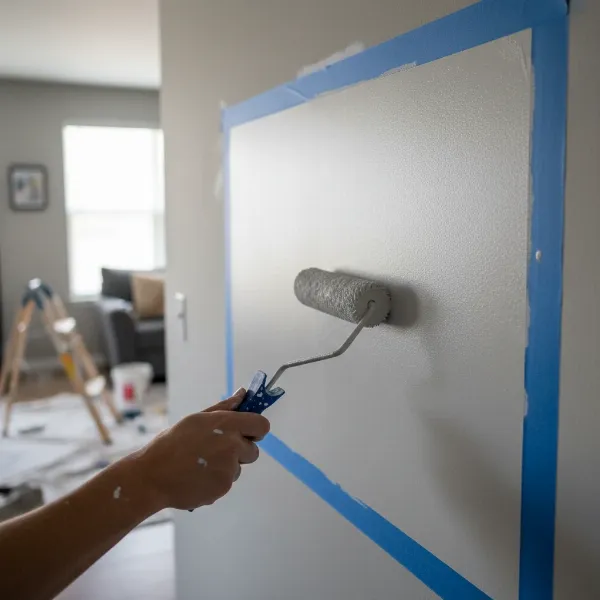 A person applying paint with a roller to a masked-off section of a wall for a DIY projector screen.
Enhancing Your Painted Screen: Borders and Calibration
Once your paint has dried, you’re just a few steps away from an optimized home theater experience. Adding a border and properly calibrating your projector can significantly enhance the visual impact of your new screen.
Adding a Black Border around your painted projector screen can dramatically improve perceived contrast and give your setup a more finished, cinematic look. The black border creates a visual frame that helps the eye focus on the projected image, making it pop. You have several options:
- Painted Border: Once your screen paint is fully cured (usually 24-48 hours), you can re-tape a 2 to 4-inch border around your screen using painter’s tape and apply a matte black paint. Ensure the tape is perfectly straight and pressed down firmly.
- Velvet Tape or Trim: For an even more professional and light-absorbing effect, consider applying black velvet tape or a fabric trim directly around the screen edges. Velvet is excellent at absorbing stray light, further boosting the perceived contrast.
- Wooden Frame: For the ultimate custom home theater aesthetic, you could construct and paint a thin wooden frame to surround your painted screen. This adds depth and a truly bespoke feel.
After the borders are in place, projector calibration is the final step to unlock the full potential of your painted screen. Turn on your projector and access its settings menu. Adjust key parameters such as:
- Brightness: Find the sweet spot where blacks are deep without losing detail in shadows.
- Contrast: Optimize the difference between the brightest whites and darkest blacks.
- Color Saturation: Ensure colors are vibrant and natural, not oversaturated or dull.
- Sharpness and Focus: Fine-tune the lens to achieve the clearest, most detailed image possible across the entire screen.
- Keystone Correction: If your projector isn’t perfectly perpendicular to the wall, use keystone correction to square up the image, though it’s always best to physically align the projector first to minimize digital distortion.
Taking the time to calibrate will ensure your painted screen delivers the most immersive and visually stunning experience possible.
Common Pitfalls and Troubleshooting
Even with careful planning, DIY projects can encounter unexpected challenges. Being aware of common pitfalls and knowing how to troubleshoot them will save you time and frustration, ensuring your painted projector screen meets your expectations.
-
Uneven Surface: This is perhaps the most critical issue. If your wall wasn’t perfectly smooth during preparation, the projected image will appear distorted, blurry, or wavy. The solution involves sanding down the affected areas, reapplying drywall compound if necessary, re-sanding with fine-grit paper (220-grit), and then re-priming and re-painting. Thorough initial preparation is your best defense against this.
-
Hotspots or Glare: These appear as overly bright, washed-out areas on your screen and are almost always caused by using paint with too much sheen (e.g., semi-gloss or eggshell) or by excessive ambient light. Ensure you are using a purely flat or matte finish paint. If using a high-gain paint, hotspots might occur if your viewing angle is too narrow. Consider a lower-gain paint or a grey screen if ambient light is an issue.
-
Roller Marks or Streaks: Visible lines or uneven patches in your paint indicate inconsistent application. This can result from using too much paint, not enough paint, applying uneven pressure, or using a low-quality roller. To fix this, you’ll need to lightly sand the affected areas with fine-grit sandpaper, clean the dust, and then apply thin, even coats of paint using a high-quality smooth foam roller and consistent technique.
-
Paint Bleed Under Tape: If your edges aren’t crisp, it means paint seeped under your painter’s tape. This often happens if the tape wasn’t pressed down firmly enough, or if it was removed when the paint was too dry. To correct this, carefully score the edge of the paint with a utility knife before peeling the tape. If bleeding has occurred, you can try to carefully touch up the bleeding areas with your wall’s base color using a small art brush.
-
Incorrect Paint Color/Sheen: Choosing the wrong color or sheen for your room and projector can lead to poor contrast, washed-out images, or inaccurate colors. Review the “Choosing the Right Paint” section to reassess your choice. Unfortunately, a significant correction may require re-sanding and re-painting with the appropriate paint. Always test a small, inconspicuous area if unsure.
By understanding these potential issues, you can either prevent them from happening or address them swiftly, ensuring your DIY painted projector screen delivers the stunning visuals you envision.
Conclusion
Creating a painted projector screen on your wall is a rewarding DIY project that transforms your viewing experience without the hefty price tag of a commercial screen. By diligently following each step—from meticulous wall preparation and selecting the ideal paint to careful application and thoughtful calibration—you unlock a customizable, cost-effective, and aesthetically pleasing large-format display. This personalized approach not only integrates seamlessly into your living space but also offers the immersive visuals typically reserved for dedicated home theaters.
Ready to dive into your next movie night or gaming session on a truly expansive display? What cinematic experience will you create in your own home with your new DIY projector screen?