For anyone who relies on a projector for presentations, home theater, or gaming, the quality of the image and the longevity of the device are paramount. Just like any high-performance electronic, projectors require regular maintenance to operate at their best. Often overlooked, the air filter plays a critical role in this maintenance, acting as the projector’s first line of defense against dust and debris. Neglecting this small but mighty component can lead to a host of problems, from diminished brightness to complete system failure. This comprehensive guide will walk you through the simple yet essential steps to clean your projector’s air filters, ensuring your visuals remain vibrant and your equipment runs smoothly for years to come.
The Unsung Hero: Understanding Projector Air Filters
What exactly are projector air filters, and why are they so crucial? Essentially, air filters are permeable barriers designed to trap airborne dust and particles before they can enter the sensitive internal components of your projector. Projectors generate a significant amount of heat during operation, and internal fans work diligently to pull in cool air and expel hot air, maintaining an optimal operating temperature. Without a clean filter, this airflow is restricted, turning the cooling system into a potential hazard rather than a protector.
The role of a clean air filter extends beyond just cooling; it directly impacts image quality and the projector’s lifespan. Dust accumulation inside the projector can settle on optical elements like the lens, lamp, and imaging chips (DLP, LCD panels), leading to blurry images, dim spots, color shifts, or a significant reduction in overall brightness. Over time, persistent overheating dueated to clogged filters can cause critical components to fail prematurely, necessitating costly repairs or even a complete replacement of the unit. Recognizing the signs of a dirty filter – such as a warning light on your projector or a noticeable drop in image performance – is the first step in proactive maintenance.
When and How Often to Clean Your Projector Air Filters
Determining the ideal cleaning schedule for your projector’s air filters depends on several factors, including its usage frequency and the environment it operates in. While a general recommendation is to clean the filters every 100 to 300 hours of use, or every 3 to 6 months, dusty environments or heavy usage might warrant more frequent attention.
Your projector is designed to alert you when its filters need attention. Many modern projectors feature built-in sensors that trigger a “filter warning” message on the screen, a flashing filter indicator light, or an audible alarm when airflow becomes restricted. Paying close attention to these signals is crucial. If you notice a visible layer of dust on the intake vents or if the projector seems louder than usual, it’s a strong indication that a cleaning is overdue. Regularly checking your projector’s manual will provide specific cleaning intervals and instructions tailored to your model.
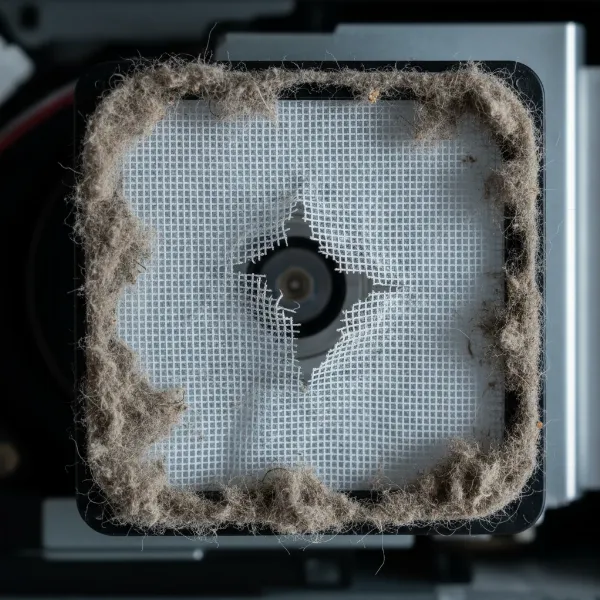
 A side-by-side comparison of a dusty projector air filter and a clean, new projector air filter, highlighting the importance of cleaning for optimal performance.
Step-by-Step Guide to Cleaning Projector Air Filters
Cleaning your projector’s air filter is a straightforward task that requires minimal tools and patience. Following these steps carefully will ensure a thorough and safe cleaning process.
First and foremost, safety is paramount. Before you begin any cleaning, always ensure your projector is completely powered off and unplugged from the main power source. Allow it to cool down fully, as internal components can retain heat for a while after use.
- Locate and Remove the Filter: Most projectors have easily accessible air filters, typically found on the side or bottom panel. Consult your projector’s user manual for the exact location and removal instructions. You may need to slide a latch, press a button, or even use a small screwdriver to open a cover. Gently pull or slide the filter out once the cover is removed.
- Shake Off Loose Dust: Hold the filter over a trash can and gently tap each side four to five times. This helps dislodge larger clumps of dust and debris without applying excessive force that could damage the filter mesh.
- Vacuum the Filter: Using a small handheld vacuum cleaner equipped with a soft brush attachment, carefully vacuum both sides of the filter. Pay particular attention to the mesh areas, ensuring all trapped dust is thoroughly removed. Move the vacuum attachment slowly and steadily across the surface.
- Clean Air Intake Vents: While the filter is out, take a moment to vacuum or gently wipe the air intake vents on the projector’s casing. Dust buildup in these areas can also impede airflow and contribute to overheating.
- Reinstallation: Once the filter is clean and completely dry (if it somehow became damp, which should be avoided), carefully slide it back into its designated slot. Ensure it clicks securely into place and then close any covers or latches you opened. Double-check that the filter is installed correctly, as improper installation can compromise its effectiveness.
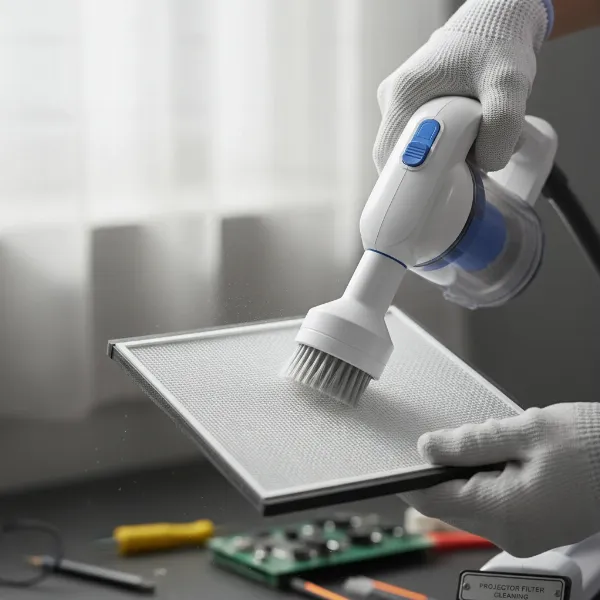 A person using a small vacuum cleaner with a brush attachment to clean a projector's air filter, demonstrating proper technique.
Essential Tools and What to Avoid
Having the right tools for the job makes all the difference in achieving a clean filter without causing damage. Your primary tool should be a small vacuum cleaner with a soft brush attachment. This allows you to effectively suck up dust without harsh abrasion. A soft lens brush or a blower bulb (the type used for camera lenses) can also be useful for dislodging stubborn dust particles from delicate areas.
It is equally important to know what not to use. Never use water, detergents, or any liquid cleaning solutions on your projector air filters. Moisture can damage the filter material, lead to mold growth, and attract more dust. Similarly, avoid using damp cloths for cleaning the filter itself. While a damp cloth is suitable for wiping the projector’s exterior, it can compromise the filter’s integrity and efficiency.
Perhaps the most crucial warning is regarding canned or compressed air. While it might seem intuitive to blow dust away, compressed air can actually push dust particles deeper into the projector’s internal optics or other sensitive components, causing more harm than good. Furthermore, compressed air canisters often contain propellants that can leave a residue, potentially affecting performance or causing damage. Stick to gentle suction and brushing for filter cleaning.
“A clean air filter is the simplest, most impactful maintenance task you can perform for your projector. It’s the frontline defense against a cascade of issues, from dim images to catastrophic overheating.” – Alex Tan, Senior Projector Technician
Beyond Cleaning: When to Replace Your Projector Air Filter
While regular cleaning can significantly extend the life of your projector air filter, there comes a time when replacement is necessary. Filters, especially those made of fine mesh, can degrade over time, losing their ability to trap dust effectively.
You should consider replacing your projector air filter if:
- It’s visibly damaged: Tears, holes, or significant warping can compromise its filtering capabilities.
- Dust is difficult to remove: If, after a thorough cleaning, the filter still appears heavily clogged or discolored, it might be time for a new one.
- Projector warnings persist: If your projector continues to display filter warnings shortly after a cleaning, the filter might no longer be functioning optimally.
- Manufacturer recommendation: Some manufacturers recommend replacing filters after a certain number of hours or a specific period, regardless of appearance. Check your manual.
Replacing a damaged or ineffective filter ensures that your projector continues to receive proper ventilation and protection, preventing internal dust accumulation and maintaining peak performance. Always use genuine replacement filters specific to your projector model for the best fit and efficiency.
 A close-up image of a projector air filter with visible damage, such as tears or holes, indicating it needs replacement.
Maintaining Optimal Projector Performance
A clean air filter is a cornerstone of overall projector health, but it’s part of a larger maintenance routine that ensures optimal performance and longevity. Regular external cleaning of the projector’s casing and lens is also vital. Use a microfiber cloth for the exterior and a specialized lens cleaning kit for the projector lens to avoid scratches and smudges.
Ensuring your projector operates in a relatively dust-free environment can also reduce the frequency of filter cleaning. Avoid placing the projector on carpeted surfaces where it can easily draw in fibers. If possible, consider mounting it to a ceiling or placing it on a clean, elevated surface. When not in use, consider covering your projector with a dust cover, especially if it’s in a high-dust area or stored for extended periods. By integrating regular air filter cleaning with these broader maintenance practices, you’ll safeguard your investment and consistently enjoy bright, clear, and reliable projection for all your viewing needs.
Conclusion
The air filter in your projector is a small component with a colossal impact on its performance and lifespan. Regular, proper cleaning is not just a recommendation; it’s a critical aspect of projector ownership that safeguards against overheating, maintains optimal image quality, and prevents costly repairs. By dedicating a few minutes to this simple maintenance task, you extend the life of your device and ensure every viewing experience is as crisp and vibrant as the manufacturer intended. Don’t let a clogged filter dim your projection dreams; make filter cleaning a regular part of your projector care routine. What steps will you take today to ensure your projector delivers its best tomorrow?
Frequently Asked Questions
How often should I clean my projector’s air filter?
|
Our Picks for the Best projector in 2026
As an Amazon Associate I earn from qualifying purchases.
|
||
| Num | Product | Action |
|---|---|---|
| 1 | Epson Pro EX11000 3-Chip 3LCD Full HD 1080p Wireless Laser Projector, 4,600 Lumens Color/White Brightness, Miracast, 2 HDMI Ports, USB Power for Streaming, Built-in 16W Speaker |

|
| 2 | HAPPRUN Native 1080P Bluetooth Mini Projector, Full HD Portable Outdoor Movie Projector with Built-in Speaker, Compatible with Smartphone, HDMI, USB, AV, Fire Stick, PS5 for Home, Bedroom, Outdoor Use |
|
| 3 | Projector-4K with WiFi and Bluetooth:[3500 ANSI/60W Dolby Audio/Official Licensed Apps], Outdoor-Projector with Smart OS 2.0 & AI Auto Focus,ONOAYO ONO5Pro 2.0 Smart Movie Projector for Indoor/Outdoor |
|
| 4 | [3500 ANSI/ Official Apps/65W Audio] Outdoor 4K Projector with WiFi and Bluetooth, Auto Focus, Auto Keystone Smart Projector Support DoIby Audio, 2026 Upgrade GO2 Short Throw Projector with 360°Stand |
|
| 5 | [Built-in Official Apps/4K Support] Smart Outdoor Projector with WiFi and Bluetooth, 800ANSI Movie Projector, DoIby Audio with Dual Speaker, Auto Focus w/ YouTube&PrimeVideo Proyector, Upgrad P62 Pro |
|
| 6 | Aurzen Roku TV Smart Projector with Wifi and Bluetooth, Roku Streaming Experience Built-in, 1080P FHD, DoIby Audio, Auto Focus & Keystone, Zoom, Movie Portable Outdoor Mini Projector, White |
|
| 7 | 【Officially-Licensed APP & Native 1080P】Thinnest 1.81\" Smart Mini Projector with WiFi and Bluetooth, Auto Focus & Keystone Portable Outdoor Projector, VOPLLS 4K Support Home Movie Projector |
|
| 8 | 1500 ANSI Official Licensed Google TV Smart Projector, HAPPRUN 4K Full HD Home Theater with Auto Focus, Dolby Sound, Wi-Fi Bluetooth, Built-in Apps, Compatible with Phone & PC, Indoor & Outdoor Use |
|
| 9 | Epson Pro EX9270 Wireless 1080p 3LCD Projector 4,100 Lumens Color and White Brightness, Apple AirPlay, Miracast, Stream from Phone or Laptop, 2 HDMI Ports, 1.6x Optical Zoom, Built-In Speaker |
|
| 10 | 【Official Licensed Google TV】4K Smart Projector with WiFi and Bluetooth, VOPLLS Outdoor Projectors with Dolby/Auto Focus, Portable Movie Phone Wireless Gaming Wifi Proyector for Bedroom/Home/Celling |
|
The frequency depends on usage and environment, but a general guideline is every 100-300 hours of operation or every 3-6 months. If you notice a filter warning light or visible dust, clean it sooner.
Can I wash my projector air filter with water?
No, you should never wash projector air filters with water, detergents, or any liquid cleaning solutions. Moisture can damage the filter material and attract more dust, leading to further problems.
What happens if I don’t clean my projector filter?
Neglecting to clean the filter can lead to reduced airflow, causing the projector to overheat. This can result in diminished brightness, color shifts, internal component damage, and ultimately shorten the projector’s lifespan.
Where is the air filter on a projector?
The air filter’s location varies by model but is typically found on the side or bottom panel of the projector. Always consult your projector’s user manual for precise instructions on locating and removing it.
Should I use compressed air to clean a projector filter?
It is generally not recommended to use compressed air to clean projector filters. Compressed air can push dust deeper into sensitive internal components, causing more harm than good, and may leave behind harmful residues. Stick to vacuuming and gentle brushing.