There’s nothing quite as frustrating as settling in for a movie night or preparing for a crucial presentation, only to be met with a projector image that’s anything but crisp. A blurry projector display can instantly ruin the experience, transforming vibrant visuals into a muddy, indistinct mess. But don’t despair! Most blurry projector issues aren’t complex internal malfunctions but rather straightforward problems with simple solutions. This comprehensive guide will walk you through the most common reasons why your projector image might be blurry and provide practical, easy-to-follow steps to get your visuals sharp and clear again. Let’s sharpen things up!
Understanding Projector Blurriness: Common Culprits
A blurry projector image can manifest in various ways – from a slight fuzziness to an entirely unfocused screen, or even blurriness only on one side or at the edges. Understanding the root cause is the first step toward a clear picture. These issues typically stem from mechanical factors like lens condition and placement, or digital settings related to resolution and correction. Often, a combination of these elements contributes to the lack of clarity you’re experiencing.
Essential Checks: Mechanical and Environmental Factors
Before diving into complex settings, let’s address the fundamental physical and environmental aspects that most frequently cause a fuzzy image. These are often the easiest to diagnose and fix.
Dirty Lens: The Overlooked Obstruction
|
Our Picks for the Best projector in 2026
As an Amazon Associate I earn from qualifying purchases.
|
||
| Num | Product | Action |
|---|---|---|
| 1 | Epson Pro EX9270 Wireless 1080p 3LCD Projector 4,100 Lumens Color and White Brightness, Apple AirPlay, Miracast, Stream from Phone or Laptop, 2 HDMI Ports, 1.6x Optical Zoom, Built-In Speaker |

|
| 2 | 【Official Licensed Google TV】4K Smart Projector with WiFi and Bluetooth, VOPLLS Outdoor Projectors with Dolby/Auto Focus, Portable Movie Phone Wireless Gaming Wifi Proyector for Bedroom/Home/Celling |
|
| 3 | Aurzen Roku TV Smart Projector with Wifi and Bluetooth, Roku Streaming Experience Built-in, 1080P FHD, DoIby Audio, Auto Focus & Keystone, Zoom, Movie Portable Outdoor Mini Projector, White |
|
| 4 | Epson Pro EX11000 3-Chip 3LCD Full HD 1080p Wireless Laser Projector, 4,600 Lumens Color/White Brightness, Miracast, 2 HDMI Ports, USB Power for Streaming, Built-in 16W Speaker |
|
| 5 | Projector-4K with WiFi and Bluetooth:[3500 ANSI/60W Dolby Audio/Official Licensed Apps], Outdoor-Projector with Smart OS 2.0 & AI Auto Focus,ONOAYO ONO5Pro 2.0 Smart Movie Projector for Indoor/Outdoor |
|
| 6 | [3500 ANSI/ Official Apps/65W Audio] Outdoor 4K Projector with WiFi and Bluetooth, Auto Focus, Auto Keystone Smart Projector Support DoIby Audio, 2026 Upgrade GO2 Short Throw Projector with 360°Stand |
|
| 7 | HAPPRUN Native 1080P Bluetooth Mini Projector, Full HD Portable Outdoor Movie Projector with Built-in Speaker, Compatible with Smartphone, HDMI, USB, AV, Fire Stick, PS5 for Home, Bedroom, Outdoor Use |
|
| 8 | 【Officially-Licensed APP & Native 1080P】Thinnest 1.81\" Smart Mini Projector with WiFi and Bluetooth, Auto Focus & Keystone Portable Outdoor Projector, VOPLLS 4K Support Home Movie Projector |
|
| 9 | 1500 ANSI Official Licensed Google TV Smart Projector, HAPPRUN 4K Full HD Home Theater with Auto Focus, Dolby Sound, Wi-Fi Bluetooth, Built-in Apps, Compatible with Phone & PC, Indoor & Outdoor Use |
|
| 10 | [Built-in Official Apps/4K Support] Smart Outdoor Projector with WiFi and Bluetooth, 800ANSI Movie Projector, DoIby Audio with Dual Speaker, Auto Focus w/ YouTube&PrimeVideo Proyector, Upgrad P62 Pro |
|
Imagine trying to look through a smudged window; the world outside appears indistinct. Your projector lens is no different. Dust, fingerprints, smudges, or even minor debris on the lens surface can scatter light, preventing a sharp image from reaching your screen. This is a remarkably common issue that many users overlook.
To resolve this, power off and unplug your projector. Gently clean the lens using a soft, lint-free microfiber cloth specifically designed for optics. For stubborn dust, a can of compressed air can be useful. If there are fingerprints or smudges, a specialized lens cleaning solution or a mixture of distilled water and isopropyl alcohol applied to the cloth (never directly to the lens) can help. Always wipe in a gentle, circular motion and avoid abrasive materials that could scratch the delicate lens surface.
Incorrect Focus and Zoom Settings
Every projector has a focus mechanism, typically a manual ring around the lens or digital controls on the remote. An improperly focused lens is a primary reason for blurriness. It’s also easy to confuse the focus ring with a zoom ring, as they are often located close together. Adjusting one when you mean to adjust the other can lead to persistent blurriness.
To achieve perfect focus, display a text-heavy image or a grid pattern on your screen. Slowly turn the focus ring or use the remote’s focus adjustment until the text or lines appear sharpest. If your projector has a zoom function, ensure it’s set appropriately, as zoom can also influence the optimal focus.
> “The simplest fix you might be missing is adjusting the focus. Many users overlook this fundamental step, especially when first setting up their projector.” – ProjectorCam Admin, Projector Expert
Projector Placement and Throw Distance
The distance between your projector and the screen, known as the “throw distance,” is critical for image clarity. Every projector has an optimal throw distance range specified by the manufacturer. If the projector is too close or too far from the screen, the lens might struggle to bring the image into sharp focus, or the image might appear distorted.
Refer to your projector’s manual for its recommended throw distance. Experiment with positioning your projector within this range. Additionally, ensure the projector is perfectly level and aligned perpendicularly with the screen. Any angle or tilt can lead to image distortion and blurriness, particularly at the edges.
Projection Surface Irregularities
While often overlooked, the surface you project onto plays a significant role in image quality. An uneven, wrinkled, or textured wall or screen can physically distort the projected image, causing blurriness, especially with fine details like text. Reflective surfaces can also interfere with autofocus features.
For the best results, use a high-quality, tensioned projection screen or a smooth, matte white wall. Ensure the surface is free from wrinkles, waves, or any imperfections that could compromise the image’s flatness and clarity.
The Forgotten Lens Cap
This might sound obvious, but it’s a mistake even seasoned users can make: forgetting to remove the lens cap. If the lens cap is partially on or was left on after setup, it will severely obstruct the light output, resulting in a dark, severely blurred, or even completely absent image. Always double-check that the lens cap is fully removed before troubleshooting.
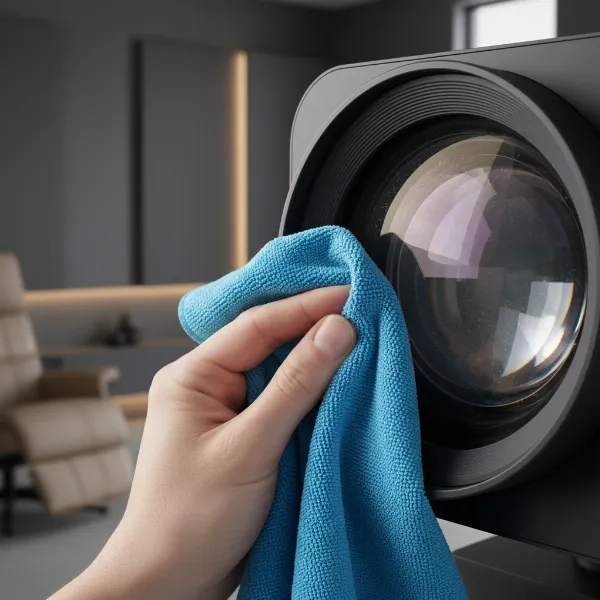 A hand gently cleaning a projector lens with a soft microfiber cloth, emphasizing clear optics and maintenance.
Digital & Connectivity Issues Affecting Clarity
Once you’ve ruled out physical obstructions and placement errors, the next area to investigate is the digital signal path and your projector’s internal settings.
Resolution Mismatch
One of the most common digital causes of a blurry image is a mismatch between the resolution of your input source (e.g., laptop, gaming console) and your projector’s native resolution. Every projector has a “native” resolution, which is the actual number of physical pixels on its display chip. When the input signal’s resolution doesn’t match this native resolution, the projector has to “scale” the image, which can lead to pixelation, fuzziness, and a loss of sharpness.
To fix this, go to your source device’s display settings and set its output resolution to match your projector’s native resolution. You can usually find the native resolution in your projector’s manual or specifications. Accessing your projector’s on-screen menu can also confirm its current resolution settings.
Excessive Keystone Correction
Keystone correction is a feature designed to square up a projected image when the projector isn’t perfectly perpendicular to the screen. While useful, excessive digital keystone correction can distort the image, stretching pixels and introducing blurriness, particularly at the edges or corners.
It’s always best to physically position your projector as squarely as possible to the screen to minimize the need for keystone correction. If you must use it, apply it sparingly. Check your projector’s menu, reset keystone correction to zero, and then gradually adjust it while observing the image for optimal clarity. Some projectors offer automatic keystone correction, which can sometimes be too aggressive.
Loose or Damaged Cables
The humble connection cable is often overlooked but can be a significant source of image blurriness. Loose, damaged, or poor-quality HDMI, VGA, or other display cables can lead to signal interference, degradation, or even complete signal loss, resulting in a fuzzy, flickering, or distorted picture.
Inspect all cables connecting your source device to your projector. Ensure they are securely plugged in at both ends. If you suspect a cable issue, try swapping it out for a known good, high-quality, shielded cable. This simple step can often resolve unexpected blurriness.
Outdated Firmware or Software Issues
Like any modern electronic device, projectors rely on firmware and drivers to function optimally. Outdated firmware can sometimes lead to performance issues, including image processing glitches that manifest as blurriness. Similarly, outdated display drivers on your connected computer can also cause problems.
Check your projector manufacturer’s website for any available firmware updates and follow their instructions carefully. For computer connections, ensure your graphics card drivers are up to date. Sometimes, a factory reset of the projector’s settings can also resolve software-related issues.
Incorrect Sharpness Settings
Most projectors include an internal “sharpness” setting, often found within the image or display menu. This setting digitally enhances the edges of objects in the image. While it might seem counterintuitive, setting the sharpness too high can actually create an unnatural, artificial look with halos or noise around objects, which can be perceived as blurriness.
Adjust the sharpness setting gradually. Start with a neutral or lower setting and increase it incrementally until the image appears crisp without introducing artifacts or harsh edges. The goal is natural clarity, not over-processed enhancement.
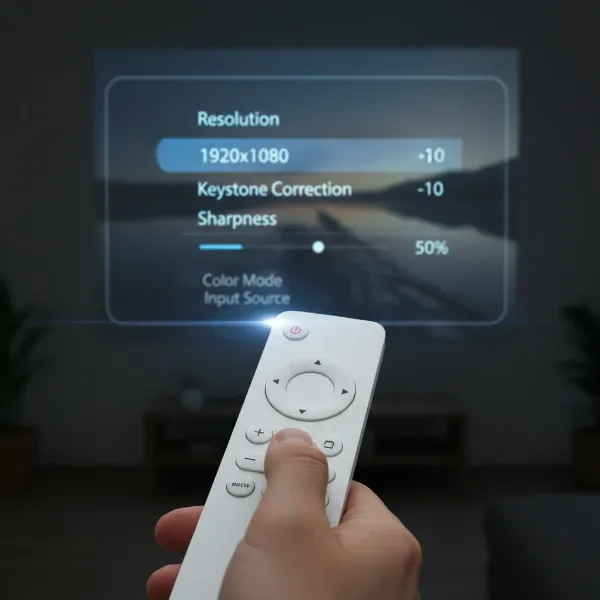 A user adjusting digital settings on a projector menu, with icons for resolution, keystone, and sharpness visible.
Advanced Troubleshooting and When to Seek Professional Help
Sometimes, the blurriness is more specific or persistent, indicating potentially more complex issues.
Partial Blurriness (One Side or Edges)
If only one side, the edges, or a specific corner of your projected image appears blurry while the rest is sharp, this usually points to an alignment or optical issue. It could be due to the projector not being perfectly square with the screen, leading to an uneven focus plane. In some advanced (often 3-chip LCD) projectors, this could also indicate an internal misalignment of the RGB panels, which would require professional servicing.
Re-check your projector’s physical alignment with extreme precision. Ensure it’s perfectly level and aimed directly at the screen’s center. If the issue persists after careful alignment and minimal keystone correction, it might be time to consult the manufacturer.
Internal Component Failure
While less common, internal hardware issues can also cause blurriness. This could include a faulty lens motor (for auto-focus models), damage to the optical elements within the lens assembly, or severe internal dust buildup that cleaning the exterior lens cannot address. If the blurriness appears suddenly, persists despite all troubleshooting, or is accompanied by unusual noises or error messages, an internal component might be failing.
When to Contact Professional Support
If you’ve systematically worked through all the common troubleshooting steps—cleaned the lens, adjusted focus and zoom, checked placement and resolution, secured cables, updated firmware, and fine-tuned settings—and your projector image remains stubbornly blurry, it’s likely an issue that requires professional intervention. This is particularly true if you suspect a damaged lens, a failing internal component, or a persistent, unresolvable edge blur. Contacting the manufacturer’s support or a certified service technician is the best course of action at this point.
Maintaining Your Projector for Optimal Clarity
Prevention is always better than cure. Regular maintenance can significantly extend your projector’s lifespan and ensure consistently clear images.
- Regular Lens Cleaning: Make it a habit to gently clean your projector lens with a microfiber cloth every few weeks or before important viewing sessions. This prevents dust and smudges from accumulating.
- Proper Placement: Always set up your projector on a stable, flat surface to prevent accidental bumps or misalignment.
- Optimal Environment: Use your projector in a relatively clean, dust-free environment. If possible, avoid placing it in areas with excessive smoke, humidity, or extreme temperature fluctuations.
- Secure Cables: Periodically check that all cables are firmly connected and free from damage.
By taking proper care of your projector and understanding these common issues, you can ensure that your projected images remain sharp, clear, and vibrant for years to come.
Conclusion
A blurry projector image can quickly dampen any viewing experience, but with a structured approach to troubleshooting, restoring clarity is often simpler than you might think. From a speck of dust on the lens to a subtle resolution mismatch, numerous factors can contribute to a fuzzy picture. The key is to methodically check physical elements like lens cleanliness, focus, and projector placement, followed by digital settings such as resolution, keystone correction, and cable integrity.
Remember, a crisp, clear projection hinges on a harmonious balance of proper hardware maintenance and correct software configuration. By diligently applying these troubleshooting tips, you empower yourself to diagnose and resolve most blurriness issues, transforming your viewing experience back into the immersive visual delight it should be. What’s the clearest image you’ve ever achieved with your projector?
Frequently Asked Questions
Why is my projector blurry on one side?
Blurriness on one side of the projector screen typically indicates a physical alignment issue. Ensure your projector is perfectly level and square (perpendicular) to the projection surface. It might also be an issue with excessive keystone correction or, in rare cases, a misaligned internal optical component that requires professional servicing.
Can a dirty lens really make my projector image blurry?
Absolutely, a dirty lens is one of the most common and easily fixable reasons for a blurry projector image. Dust, fingerprints, or smudges on the lens surface scatter light, preventing a clear, focused picture from being projected. Regular, gentle cleaning with appropriate materials can significantly improve image clarity.
How often should I clean my projector lens?
The frequency of lens cleaning depends on your environment and usage. In dusty conditions or with frequent use, cleaning every few weeks or once a month is advisable. For occasional use in a clean environment, cleaning every few months or when you notice image degradation should suffice.
What is native resolution and why is it important?
Native resolution refers to the fixed number of physical pixels on your projector’s display chip. It’s crucial because the projector produces its sharpest image when the input signal’s resolution exactly matches this native resolution. When resolutions don’t match, the projector scales the image, which can lead to blurriness and reduced clarity.