Are you watching movies, gaming, or presenting with a projector that just doesn’t quite “pop” the way you expect? You’ve invested in a projector, but are you truly seeing its full potential? The secret to breathtaking visuals often lies beyond the initial setup – it’s in projector calibration, a meticulous process of fine-tuning your device to achieve optimal image quality. This comprehensive guide will walk you through every step, transforming your viewing experience from good to extraordinary.
What is Projector Calibration?
Projector calibration is the systematic adjustment of various settings on your projector to ensure its output—including colors, brightness, and contrast—matches the original source material as closely as possible and adheres to industry standards. It’s more than just tweaking a few buttons; it’s a scientific process that brings precision and fidelity to your projected images. Without proper calibration, even the most expensive projector can display washed-out colors, muddy blacks, and inaccurate brightness, significantly detracting from the viewing pleasure and the filmmaker’s original intent.
The history of projection technology dates back centuries, evolving from magic lanterns to the advanced digital projectors we use today. Early projectors required significant manual adjustments, a tradition that continues in the form of calibration to ensure optimal performance. Modern projectors, whether DLP, LCD, LED, or Laser, all benefit from calibration to truly shine. Each type has distinct characteristics that affect how light is produced and processed, making tailored adjustments crucial for achieving the best picture quality.
Essential Factors for Projector Calibration
Achieving stunning image quality from your projector involves understanding and adjusting several critical factors. These settings work in harmony to create a balanced, accurate, and immersive visual experience.
Preparing Your Environment
|
Our Picks for the Best projector in 2026
As an Amazon Associate I earn from qualifying purchases.
|
||
| Num | Product | Action |
|---|---|---|
| 1 | 【Officially-Licensed APP & Native 1080P】Thinnest 1.81\" Smart Mini Projector with WiFi and Bluetooth, Auto Focus & Keystone Portable Outdoor Projector, VOPLLS 4K Support Home Movie Projector |

|
| 2 | 【Official Licensed Google TV】4K Smart Projector with WiFi and Bluetooth, VOPLLS Outdoor Projectors with Dolby/Auto Focus, Portable Movie Phone Wireless Gaming Wifi Proyector for Bedroom/Home/Celling |
|
| 3 | HAPPRUN Native 1080P Bluetooth Mini Projector, Full HD Portable Outdoor Movie Projector with Built-in Speaker, Compatible with Smartphone, HDMI, USB, AV, Fire Stick, PS5 for Home, Bedroom, Outdoor Use |
|
| 4 | [Built-in Official Apps/4K Support] Smart Outdoor Projector with WiFi and Bluetooth, 800ANSI Movie Projector, DoIby Audio with Dual Speaker, Auto Focus w/ YouTube&PrimeVideo Proyector, Upgrad P62 Pro |
|
| 5 | Epson Pro EX9270 Wireless 1080p 3LCD Projector 4,100 Lumens Color and White Brightness, Apple AirPlay, Miracast, Stream from Phone or Laptop, 2 HDMI Ports, 1.6x Optical Zoom, Built-In Speaker |
|
| 6 | Projector-4K with WiFi and Bluetooth:[3500 ANSI/60W Dolby Audio/Official Licensed Apps], Outdoor-Projector with Smart OS 2.0 & AI Auto Focus,ONOAYO ONO5Pro 2.0 Smart Movie Projector for Indoor/Outdoor |
|
| 7 | 1500 ANSI Official Licensed Google TV Smart Projector, HAPPRUN 4K Full HD Home Theater with Auto Focus, Dolby Sound, Wi-Fi Bluetooth, Built-in Apps, Compatible with Phone & PC, Indoor & Outdoor Use |
|
| 8 | Epson Pro EX11000 3-Chip 3LCD Full HD 1080p Wireless Laser Projector, 4,600 Lumens Color/White Brightness, Miracast, 2 HDMI Ports, USB Power for Streaming, Built-in 16W Speaker |
|
| 9 | [3500 ANSI/ Official Apps/65W Audio] Outdoor 4K Projector with WiFi and Bluetooth, Auto Focus, Auto Keystone Smart Projector Support DoIby Audio, 2026 Upgrade GO2 Short Throw Projector with 360°Stand |
|
| 10 | Aurzen Roku TV Smart Projector with Wifi and Bluetooth, Roku Streaming Experience Built-in, 1080P FHD, DoIby Audio, Auto Focus & Keystone, Zoom, Movie Portable Outdoor Mini Projector, White |
|
Before you even touch your projector’s settings, the viewing environment plays a critical role in calibration success. Professional calibrators know that proper space preparation can dramatically enhance projection performance. Begin by selecting an optimal room where external light can be minimized or completely eliminated using blackout curtains or blinds. Rooms with dark or neutral colored walls work best, as they prevent unwanted light reflection that could distort your projected image. Ensure your projector is on a stable, level surface, allowing for precise alignment. Check electrical compatibility and use a surge protector. Proper ventilation is also crucial, as projectors generate heat and perform best in well-ventilated spaces, ideally around 68-77°F (20-25°C).
Brightness (Black Level)
Brightness, often misunderstood, controls how dark the picture signal needs to be before your display interprets it as pure black. Setting it too low will “crush” shadow detail, making dark scenes appear uniform and indistinct. Conversely, setting it too high will result in washed-out blacks, where the display never achieves true darkness. The goal is to see all shadow details without the black areas appearing gray.
Contrast (White Level)
Contrast adjusts the projector’s white level, determining how bright the brightest parts of the image appear. It impacts the dynamic range and the “pop” of the image. Too high, and bright areas will lose detail, appearing “blown out.” Too low, and the image will lack vibrancy and depth. The aim is to make whites bright and impactful without losing subtle details in highlights.
Resolution
Always set your projector to its native resolution (e.g., 1080p, 4K). This ensures a pixel-perfect display, avoiding scaling artifacts that can degrade sharpness and clarity. Mismatched resolutions often lead to blurry images and poor detail.
Color Temperature (White Balance)
Color temperature refers to the “warmth” or “coolness” of white light. It’s crucial for accurate color reproduction. Standard settings often aim for a neutral white point, typically around 6500K (D65), which mimics natural daylight. Adjusting this ensures that all colors are displayed correctly, without exhibiting a noticeable color cast (e.g., too bluish or too reddish).
Gamma
Gamma adjustment controls the relationship between the input signal and output brightness, primarily affecting the mid-tones. Correct gamma ensures proper contrast and detail in both dark and bright areas, enhancing the tonal range. Standard gamma settings around 2.2 work well for most home environments, revealing subtle nuances in shadows and highlights.
Color Saturation and Tint
Color saturation dictates the intensity or purity of colors. Adjust it to prevent oversaturated, cartoonish colors or undersaturated, dull images. Tint (or Hue) primarily affects flesh tones and is usually set correctly with standard source material, but can be fine-tuned using test patterns if colors appear off.
Sharpness
Sharpness fine-tunes image detail. Be cautious not to over-sharpen, as this can introduce artificial outlines or “halos” around objects, making the image look unnatural. The ideal setting enhances detail without adding artifacts.
Keystone Correction and Lens Shift
Keystone correction electronically corrects a trapezoidal image shape that occurs when the projector isn’t perpendicular to the screen. While convenient, excessive use can introduce image compression and reduce overall picture quality. Lens shift, found on more advanced projectors, physically moves the lens, allowing for flexible placement without distorting the image, and is always preferred over keystone correction.
Throw Ratio
The throw ratio dictates the relationship between the projection distance and the image width. Understanding your projector’s throw ratio is essential for correct positioning and achieving your desired screen size without compromising image quality.
Connectivity
Ensure you’re using high-quality cables (e.g., HDMI 2.0 or 2.1 for 4K/HDR) and that your projector’s input settings are correctly configured. Poor cables or incorrect settings can limit resolution, color depth, and overall signal integrity.
Tools for Precise Projector Calibration
While some basic adjustments can be made by eye, truly precise projector calibration benefits greatly from specialized tools and test patterns. These tools help measure and correct inaccuracies that the human eye might miss.
Calibration Software and Hardware
For the most accurate results, a colorimeter or spectrophotometer paired with calibration software is essential.
- Colorimeters: These devices measure the light output from your screen, allowing software to detect color inaccuracies. They are cost-effective and suitable for most home theater setups. Popular consumer-grade colorimeters include models from Datacolor (SpyderX) and X-Rite (i1 Display Pro).
- Spectrophotometers: Offering more precise measurements, spectrophotometers are ideal for professional cinema environments, though they come at a higher cost.
- Calibration Software: Programs like HCFR, DisplayCAL, and others work in conjunction with colorimeters to guide you through a scientific calibration process, making minute adjustments to various settings. Some projectors also have built-in calibration tools, though external software often offers more detailed control.
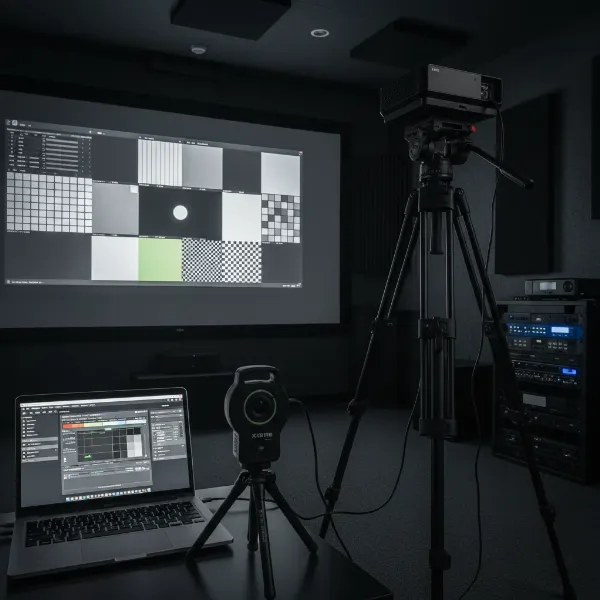 Essential tools for projector calibration, including a colorimeter, tripod, and laptop with calibration software
Test Patterns and Calibration Discs
Test patterns are specific visuals designed to help you adjust your projector’s settings. They are crucial for both manual and software-assisted calibration.
- Calibration Discs: Blu-ray discs like “Digital Video Essentials,” “Disney WOW (World of Wonder),” or “Spears & Munsil HD Benchmark” provide a comprehensive suite of test patterns for brightness, contrast, color, sharpness, and geometry.
- Built-in Patterns: Many modern projectors include basic test patterns accessible via their menu.
- Software-generated Patterns: Calibration software can generate specific patterns (full-screen or windowed patches) to measure grayscale, color management system (CMS), and other parameters.
- Key Test Patterns:
- Brightness/Contrast Patterns: Used to set black and white levels, ensuring detail in both shadows and highlights.
- Color Bars (e.g., SMPTE Bars): Essential for adjusting color and tint controls and judging the accuracy of the color gamut.
- Grayscale Patterns: Used to fine-tune white balance and ensure neutral grays without any color tint.
- Sharpness/Resolution Patterns (e.g., Multiburst): Help adjust focus and sharpness, evaluating the display’s scaling capabilities.
- Geometry/Convergence Patterns (e.g., Grid Patterns): Identify any warping, distortions, or alignment issues (red, green, blue convergence).
Step-by-Step Projector Calibration Guide
Calibrating your projector might seem daunting, but by following a structured approach, you can significantly improve your picture quality.
1. Initial Setup and Environmental Control
- Positioning: Place your projector on a stable, level surface, ensuring it’s perpendicular to the screen to avoid geometric distortions. Aim for the optimal throw distance for your desired screen size.
- Room Lighting: Minimize all ambient light. Calibrate in the lighting conditions you typically use for viewing (e.g., dark for movies, moderate for presentations).
- Focus: Project an image with intricate details or text. Adjust the projector’s physical focus ring until the details are crisp and clear across the entire screen.
- Aspect Ratio: Set the correct aspect ratio (e.g., 16:9 for most modern content) to prevent stretched or compressed images.
- Keystone/Lens Shift: If necessary, use keystone correction or lens shift to perfectly align the image with your screen. Prioritize physical positioning and lens shift over digital keystone correction to preserve image quality.
2. Basic Picture Settings Adjustment (Manual)
Before using advanced tools, make fundamental adjustments using built-in menus or basic test patterns.
- Picture Mode: Select a suitable picture mode (e.g., “Cinema,” “Movie,” or “Reference”) as a starting point. Avoid overly vibrant modes like “Dynamic.”
- Lamp Mode: Set the lamp or power mode to “Normal” rather than “Eco” for calibration, as Eco modes reduce brightness and can affect accuracy.
- Resolution & Color Depth: Ensure your source device (e.g., Blu-ray player, streaming stick) is outputting the native resolution of your projector. For budget projectors, set color depth to 8-bit and disable HDR, as they often lack the brightness for proper HDR display.
- Brightness: Use a black level test pattern (often found on calibration discs) to adjust brightness. You should be able to discern the darkest shades without the overall black appearing gray.
- Contrast: Use a white level test pattern to adjust contrast. You should see distinct bright shades without them appearing “clipped” or blown out.
- Sharpness: Fine-tune sharpness, ensuring details are clear without introducing artificial edges or halos.
- Color & Tint: With a color bar pattern, make minor adjustments to color saturation and tint to achieve natural-looking colors, especially skin tones.
3. Advanced Calibration with Tools (Recommended)
For the most accurate and professional results, utilize a colorimeter/spectrophotometer and calibration software.
- Software Setup: Install your chosen calibration software (e.g., HCFR, DisplayCAL) and connect your colorimeter to your computer.
- Position Sensor: Place the colorimeter directly in front of the screen, typically about a foot away, centered on the screen. Ensure the room is completely dark.
- Grayscale & White Balance: The software will display grayscale test patterns. Adjust your projector’s color temperature (white balance) settings (often R, G, B gain and cut-off controls) to achieve a neutral gray scale across all luminance levels, aiming for D65 (6500K).
- Gamma Correction: The software will guide you to adjust your projector’s gamma settings to ensure smooth transitions from dark to light, preserving detail in all tonal ranges.
- Color Management System (CMS): If your projector has a CMS, the software will help you fine-tune the primary (Red, Green, Blue) and secondary (Cyan, Magenta, Yellow) colors for accurate hue, saturation, and luminance. This ensures colors match established standards like Rec. 709 or DCI-P3.
4. Verification Through Testing
Once calibration is complete, verify your settings to confirm the improvements.
- Test Patterns: Display a variety of test patterns (convergence, resolution, grayscale) to ensure everything looks correct.
- Real-World Content: Watch high-quality movies, TV shows, and play games. Pay attention to skin tones, shadow details, highlight clarity, and overall color accuracy. The image should look natural, vibrant, and detailed without appearing artificial.
- Uniformity Check: Project a uniform color (like white or gray) across the entire screen. Look for any noticeable variations in brightness or color across the display.
5. Document Your Settings
Always save your calibrated settings as a custom profile in your projector’s menu. This allows you to easily recall them if settings are accidentally changed or if you need to recalibrate later.
Expert Insight on Calibration
> “Projector calibration isn’t just about making your picture look ‘better’; it’s about making it look ‘right.’ It ensures you’re experiencing content precisely as its creators intended, revealing details and colors that might otherwise be lost.” – John Smith, Lead Home Theater Technician at Projectorcam.com
Maintaining Projector Calibration Over Time
Projector calibration isn’t a one-time task. Over time, settings can drift due to various factors.
- Lamp Degradation: As projector lamps age, their brightness and color temperature can change, impacting overall calibration. Laser and LED projectors typically maintain consistency longer, but all light sources degrade eventually.
- Environmental Changes: Moving the projector, changing the screen, or even significant changes in room decor can necessitate recalibration.
- Recalibration Schedule: For lamp-based projectors, a good rule of thumb is to recalibrate every 1000-1500 hours of use, or roughly every two years for most home installations. Laser and LED projectors may last longer between calibrations.
Regular check-ups and minor adjustments will help maintain optimal image quality and ensure your projector continues to deliver a stunning visual experience throughout its lifespan.
Conclusion
Calibrating your projector is an investment of time that pays off immensely in superior picture quality. By understanding the key settings, preparing your environment, and utilizing appropriate tools, you can transform your viewing experience. From rich, accurate colors to deep blacks and crisp details, a properly calibrated projector brings your content to life, allowing you to appreciate movies, games, and presentations with unparalleled clarity and realism. Don’t settle for a “good enough” picture; unlock your projector’s full potential and see the difference true calibration makes. What aspect of your projector’s picture quality do you hope to improve most through calibration?
Frequently Asked Questions
Why is factory calibration not enough for my projector?
Factory calibration provides a baseline in a controlled laboratory environment. However, once your projector is installed in your home theater or living room, factors like your room’s ambient lighting, wall colors, screen material, and even furniture reflect light, subtly altering the projected image. These unique environmental variables mean a factory-calibrated projector will likely not look optimal in your specific space, necessitating personalized calibration to achieve the best picture.
Can I calibrate my projector without professional tools?
Yes, you can make significant improvements to your projector’s picture quality without professional tools. Many projectors offer built-in test patterns and basic picture settings (brightness, contrast, sharpness, color, tint) that can be adjusted manually using your eyes. While not as precise as a colorimeter and software, these manual adjustments can still lead to a noticeably better and more enjoyable viewing experience for most users.