Bringing the big screen experience home often starts with a projector, but finding the perfect mount can sometimes be a challenge. Commercial options may not always fit your specific space, budget, or aesthetic vision, leaving you longing for a more tailored solution. Fortunately, creating your own DIY projector mount is not only a cost-effective alternative but also an incredibly rewarding project that allows for complete customization and seamless integration into your home theater. This guide will walk you through the essential considerations, popular design ideas, and practical steps to build a secure and stylish projector mount that perfectly suits your needs.
Why Choose a DIY Projector Mount?
The allure of a DIY projector mount extends beyond just saving money. It offers unparalleled flexibility to design a solution that precisely matches your projector’s dimensions, your room’s layout, and your personal style. Unlike generic store-bought mounts, a homemade version can be crafted to blend discreetly with your decor or stand out as a unique focal point. This hands-on approach empowers you to overcome installation hurdles, ensure optimal projector performance through thoughtful placement and ventilation, and take pride in a custom setup that truly enhances your viewing experience.
Essential Considerations Before You Build
Before you grab your tools, careful planning is crucial for a successful and safe DIY projector mount. Considering these factors will help you choose the best design and materials.
Projector Weight & Size
|
Our Picks for the Best projector in 2026
As an Amazon Associate I earn from qualifying purchases.
|
||
| Num | Product | Action |
|---|---|---|
| 1 | 【Official Licensed Google TV】4K Smart Projector with WiFi and Bluetooth, VOPLLS Outdoor Projectors with Dolby/Auto Focus, Portable Movie Phone Wireless Gaming Wifi Proyector for Bedroom/Home/Celling |

|
| 2 | 【Officially-Licensed APP & Native 1080P】Thinnest 1.81\" Smart Mini Projector with WiFi and Bluetooth, Auto Focus & Keystone Portable Outdoor Projector, VOPLLS 4K Support Home Movie Projector |
|
| 3 | [3500 ANSI/ Official Apps/65W Audio] Outdoor 4K Projector with WiFi and Bluetooth, Auto Focus, Auto Keystone Smart Projector Support DoIby Audio, 2026 Upgrade GO2 Short Throw Projector with 360°Stand |
|
| 4 | Epson Pro EX11000 3-Chip 3LCD Full HD 1080p Wireless Laser Projector, 4,600 Lumens Color/White Brightness, Miracast, 2 HDMI Ports, USB Power for Streaming, Built-in 16W Speaker |
|
| 5 | 1500 ANSI Official Licensed Google TV Smart Projector, HAPPRUN 4K Full HD Home Theater with Auto Focus, Dolby Sound, Wi-Fi Bluetooth, Built-in Apps, Compatible with Phone & PC, Indoor & Outdoor Use |
|
| 6 | Projector-4K with WiFi and Bluetooth:[3500 ANSI/60W Dolby Audio/Official Licensed Apps], Outdoor-Projector with Smart OS 2.0 & AI Auto Focus,ONOAYO ONO5Pro 2.0 Smart Movie Projector for Indoor/Outdoor |
|
| 7 | Aurzen Roku TV Smart Projector with Wifi and Bluetooth, Roku Streaming Experience Built-in, 1080P FHD, DoIby Audio, Auto Focus & Keystone, Zoom, Movie Portable Outdoor Mini Projector, White |
|
| 8 | [Built-in Official Apps/4K Support] Smart Outdoor Projector with WiFi and Bluetooth, 800ANSI Movie Projector, DoIby Audio with Dual Speaker, Auto Focus w/ YouTube&PrimeVideo Proyector, Upgrad P62 Pro |
|
| 9 | HAPPRUN Native 1080P Bluetooth Mini Projector, Full HD Portable Outdoor Movie Projector with Built-in Speaker, Compatible with Smartphone, HDMI, USB, AV, Fire Stick, PS5 for Home, Bedroom, Outdoor Use |
|
| 10 | Epson Pro EX9270 Wireless 1080p 3LCD Projector 4,100 Lumens Color and White Brightness, Apple AirPlay, Miracast, Stream from Phone or Laptop, 2 HDMI Ports, 1.6x Optical Zoom, Built-In Speaker |
|
The physical dimensions and weight of your projector are paramount. A bulky, heavy projector will require a much more robust mounting solution than a compact, lightweight model. Always check your projector’s specifications to ensure your chosen materials and fasteners can safely support its weight. Overlooking this can lead to instability or, worse, damage to your equipment.
Location: Ceiling, Wall, or Furniture?
Your desired projection location dictates the type of mount. Ceiling mounts offer a clean, professional look and keep the projector out of the way, ideal for dedicated home theaters. Wall mounts are excellent for shorter throw projectors or when ceiling installation isn’t feasible. Repurposing furniture or using a tripod provides portable or temporary solutions. Each location has unique requirements for stability and installation.
Throw Distance & Offset
Understanding your projector’s throw distance (how far it needs to be from the screen for a given image size) and lens offset (how much the image shifts vertically from the lens center) is critical for optimal image alignment. These specifications, usually found in your projector’s manual, will determine the precise placement of your mount to avoid image distortion and ensure a perfectly framed picture.
Ventilation
Projectors generate heat, and proper ventilation is vital for their longevity and performance. Ensure your DIY mount design allows for adequate airflow around the projector. Avoid enclosing it too tightly, as this can lead to overheating and potential damage. If building an enclosure, consider adding small fans.
Cable Management
A clean setup not only looks better but also prevents trip hazards and keeps cables organized. Plan how you will route power and video cables to and from your projector. Integrated cable channels, conduits, or simple cable ties can transform a messy tangle into a tidy, professional installation.
Room Aesthetics
Consider how the mount will look in your room. Will it be a subtle, hidden feature or a visible part of your decor? Choose materials and finishes that complement your existing interior design. Painting wood or PVC to match your ceiling or wall can help the mount blend in seamlessly.
Popular DIY Projector Mount Ideas
Numerous creative and practical DIY projector mount ideas exist, ranging from simple shelves to more involved suspended platforms. Here are some of the most popular options to inspire your project.
Wooden Shelf Wall Mount
A classic and versatile choice, a wooden shelf mount provides a stable platform and can double as a decorative element. You can select a plank of wood—from sleek stained oak to rustic reclaimed barn wood—to match your room’s aesthetic. Ensure the shelf is firmly anchored to wall studs with sturdy brackets or heavy-duty wall anchors for maximum support. This method allows for easy adjustment of the projector’s position by simply sliding it along the shelf, offering flexibility in your setup.
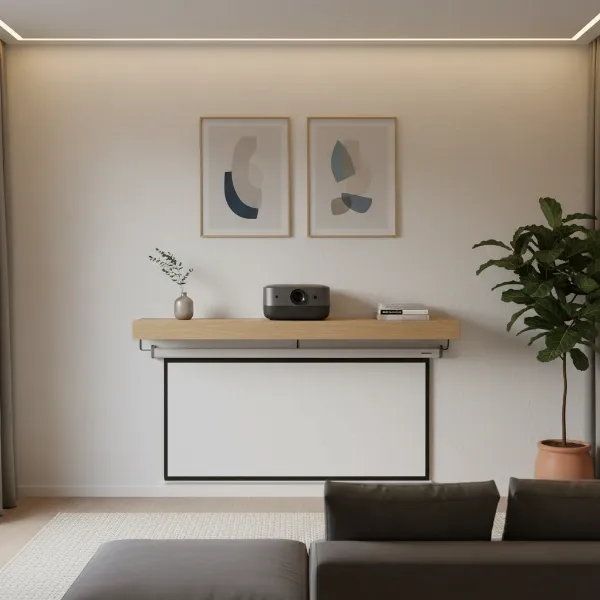 A minimalist wooden shelf wall mount securely holding a projector in a modern living room.
PVC Pipe Ceiling Mount
For a budget-friendly and lightweight option, PVC pipes offer an innovative solution for a homemade ceiling mount. This involves crafting a bracket-style structure using PVC pipes and fittings, which can be cut, bent, and shaped to cradle your projector securely. The inherent strength and lightweight nature of PVC ensure safety. For secure ceiling attachment, consider adding flanges to the PVC ends, allowing direct fastening to ceiling joists. A coat of paint can easily give it a polished finish to match your room.
Suspended Platform Ceiling Mount
Similar to a mini suspended table, this type of mount is crafted from robust materials like wood or metal and attached to the ceiling using strong chains or steel cables. This design gives the illusion of your projector floating mid-air and offers ample space for heat dissipation. The height can often be adjusted by modifying the length of the chains or cables. Painting the platform to match your room’s decor can provide a more finished look.
Simple Wall Bracket (Wood or Metal)
If you prefer a minimalist design, a simple wall bracket can be created from sturdy pieces of wood or metal. This direct approach focuses on functionality and takes up minimal space. You can customize the bracket’s size and angle to fit your projector and projection needs. Ensure it’s securely fastened into wall studs to guarantee stability.
Repurposed Furniture or Tripod
For a quick, temporary, or portable solution, repurposing existing furniture like a coffee table or a deep bookshelf can be highly effective. A sturdy coffee table can become a versatile projector platform that blends into your living room, allowing you to move the projector as needed. Similarly, a bookshelf can discreetly house your projector amidst books and decor, providing a stable surface. A camera tripod can also serve as an excellent portable and adjustable mount for impromptu movie nights or outdoor viewings.
Step-by-Step Guide for a Basic Wooden Ceiling Mount
This detailed guide outlines how to construct a straightforward and secure wooden ceiling mount, a popular choice for its stability and ease of customization.
Step 1: Gather Your Materials and Tools
- Materials:
- Wood board (e.g., 1×8 or 1×10 inch, length depends on projector size and ceiling joist spacing)
- Smaller wood pieces (e.g., 1×3 inch for mounting rails)
- Wood screws (various lengths for attaching wood pieces and securing to ceiling)
- Heavy-duty lag bolts (if attaching directly to ceiling joists)
- Wood glue (optional, for added strength)
- Paint or stain (to match decor)
- Cable ties or clips for cable management
- Tools:
- Measuring tape
- Pencil
- Stud finder
- Drill and drill bits
- Saw (circular saw, miter saw, or jigsaw)
- Level
- Screwdriver (or drill with appropriate bits)
- Safety glasses and gloves
Step 2: Plan and Measure
Measure your projector’s footprint, including any ventilation areas. Determine the ideal location on your ceiling, taking into account throw distance, screen alignment, and power/cable access. Use a stud finder to locate ceiling joists, as these are critical for secure mounting. Mark the exact points where your mount will attach to the joists.
Step 3: Cut and Assemble the Projector Platform
- Cut the main platform: Cut your larger wood board (e.g., 1×8 or 1×10) to a length that is slightly wider and longer than your projector, ensuring stability and space for airflow.
- Create mounting rails (if needed): If your projector has standard mounting points on its base, you might need to create smaller wooden rails (e.g., 1x3s) that attach to the platform and align with these points. You could also just drill directly into the platform to match your projector’s mounting holes. Some DIYers create a cradle or box from wood to hold the projector securely.
- Assemble the platform: Attach the smaller mounting rails to the main platform using wood screws and, optionally, wood glue. Ensure all connections are strong and square. Test fit your projector on the assembled platform to confirm it sits securely and has adequate ventilation.
Step 4: Prepare and Secure to the Ceiling
- Pre-drill holes: On your assembled wooden mount, pre-drill holes where it will attach to the ceiling joists. Make sure these align with the joist marks you made earlier.
- Paint/Stain (optional): Before mounting, paint or stain your wooden mount to match your ceiling or room decor for a more integrated look. Let it dry completely.
- Mount the structure: With the help of a second person, hold the assembled mount against the ceiling, aligning the pre-drilled holes with the ceiling joists. Use heavy-duty lag bolts to securely fasten the mount to the joists. Ensure it is perfectly level before tightening all bolts completely. A ceiling-mounted projector provides a professional and polished appearance.
Step 5: Attach the Projector and Manage Cables
- Attach the projector: Carefully place your projector onto the prepared platform. Secure it using screws through the platform into the projector’s mounting holes (if applicable) or by custom straps/brackets you’ve integrated into your wooden design. Projectors are often designed to be mounted upside down.
- Cable management: Route all necessary cables (power, HDMI, etc.) neatly along the mount and ceiling. Use cable ties, clips, or a cable management sleeve to keep them organized and out of sight. This helps create a clean, uncluttered setup.
Tools and Materials You’ll Need
Having the right tools and materials is essential for any DIY project. For a DIY projector mount, you’ll primarily work with wood or PVC, requiring a basic set of hand and power tools.
General Tools:
- Measuring Tape & Pencil: For accurate measurements and markings.
- Stud Finder: Crucial for locating secure anchor points in walls or ceilings.
- Drill & Drill Bits: For pre-drilling holes and driving screws.
- Saw: A miter saw, circular saw, or jigsaw for cutting wood or PVC pipes.
- Level: To ensure your mount is perfectly straight and your projection is level.
- Screwdriver: Manual or power driver.
- Safety Gear: Safety glasses and work gloves are always recommended.
Specific Materials:
- Wood: Plywood, 1x lumber (pine, oak, etc.) for platforms, shelves, or brackets.
- PVC Pipes & Fittings: For lightweight and customizable ceiling mounts.
- Metal Brackets/Angles: For additional support or simpler wall mounts.
- Screws & Bolts: Wood screws, lag bolts (for ceiling/wall studs), machine screws (for projector mounting points).
- Wall Anchors/Toggle Bolts: If mounting to drywall where studs aren’t available (ensure they support the projector’s weight).
- Paint/Stain: To finish and protect your mount, matching your room’s aesthetic.
- Cable Management: Cable ties, clips, or sleeves for a tidy installation.
Safety Tips and Best Practices
Building a DIY projector mount can be a fulfilling project, but safety should always be your top priority. Adhering to best practices ensures a secure installation and protects your valuable equipment.
- Verify Mounting Points: Always use a stud finder to locate and mount your DIY structure directly into ceiling joists or wall studs. Drywall alone cannot support the weight of most projectors over time. For concrete or brick, use appropriate masonry anchors.
- Respect Weight Capacity: Ensure all materials—wood, PVC, screws, and anchors—are rated to comfortably exceed your projector’s weight. A mount that slowly sags or fails can cause significant damage.
- Provide Ample Ventilation: Projectors generate considerable heat. Design your mount to allow for unrestricted airflow around the device to prevent overheating, which can shorten its lifespan.
- Secure Cable Routing: Properly manage all cables to prevent them from dangling, which can be a tripping hazard or lead to accidental disconnection. Use cable clips or ties to secure them neatly along the mount and ceiling/wall.
- Test Stability Thoroughly: Before leaving your projector permanently on the mount, gently test its stability. Apply light pressure to ensure there’s no wobbling or signs of weakness. If you’re unsure, reinforce the mount.
- Consult Projector Manual: Always refer to your projector’s instruction manual for specific mounting requirements, weight limits, and recommended clearances. Some projectors have unique mounting patterns.
Conclusion
Creating a DIY projector mount is a rewarding endeavor that offers unparalleled customization, cost savings, and the satisfaction of building something truly tailored to your home theater. By carefully considering your projector’s specifications, your room’s layout, and practical design principles, you can construct a secure and aesthetically pleasing mount that elevates your viewing experience. Whether you opt for a sleek wooden shelf, a robust PVC pipe solution, or a suspended platform, the journey of crafting your own mount empowers you to achieve the perfect cinematic setup. So, roll up your sleeves, unleash your creativity, and enjoy the fruits of your labor with a perfectly positioned projector.
What unique design elements will you incorporate into your DIY projector mount to make it truly yours?
Frequently Asked Questions
Can I adjust the height of a DIY projector ceiling mount?
Yes, many DIY ceiling mount designs can incorporate height adjustability. For suspended platform mounts, you can adjust chain or cable lengths. For wooden pipe mounts, designs utilizing sliding mechanisms or adjustable threaded rods can allow for height modification. Planning for adjustability during the design phase is key.
How do I ensure my DIY projector mount is stable?
Stability is paramount. Always mount your structure into solid ceiling joists or wall studs using heavy-duty screws or lag bolts. Avoid relying solely on drywall anchors unless they are specifically rated for substantial weight and your projector is very light. Reinforce joints with wood glue or additional fasteners for increased rigidity.
Can I build a DIY projector mount if I live in an apartment?
Yes, but with careful consideration for temporary or less invasive solutions. Wall-mounted shelves that utilize existing studs are often permissible. Portable options like tripod stands or repurposed furniture (e.g., a sturdy bookshelf or coffee table) are excellent choices that require no permanent alterations to the structure. Always check your lease agreement for mounting restrictions.